Hacking The iOS Interview
Swift — Functions & Closures — Part II

How was the previous part? I hope it helped you get a brief of what kind of questions related to functions are asked in an interview. In case you haven’t got a chance to look at the first part, I would highly recommend you to visit Swift — Functions & Closure — Part I before we move ahead.
I know you are consistently following Hacking the iOS Interview preparation series but if somehow you stumbled directly here, I would suggest taking a look at our main story (it host every link in this series).
How can you create closures in swift ?
A closure is a function combined with any captured variables. And functions can be created using either the func keyword or { } closure expression. But the important thing here is that function has to capture values from outside their local scope.
Usually claps, being a local variable of clapCounter, would go out of scope just after the return statement, and it’d be destroyed. Instead, because it’s captured by innerFunc, the Swift runtime will keep it alive until the function that captured it gets destroyed. We can call the myClaps closure multiple times, and we see that the total number of claps increases.
This is one way of creating a closure while the other way can be using closure expression {}.
What is the capture list and explain output for the code snippets?
Closures syntax has a way to specify all constants and variables it wants to capture from the surrounding context in which it’s defined. For this, they use a comma-separated list within [ ] before their parameter list and this is known as a capture list. Values can be captured as either strong, weak and unowned, depending upon the use case.
If no capture list is present in the closure declaration, then the evaluation of all variables of the surrounding context referenced within a closure will be deferred until the closure call happens. This means any change to webSeries before invoking closure will be reflected inside closure.
In case of an escaping closure, it’ll implicitly capture any objects, values and functions that are referenced within it. Since such closures may be executed at a later time, they need to maintain strong references to all of their dependencies to prevent them from being deallocated in the meantime.
The capture list creates a copy webSeries during closure declaration. This means captured value doesn’t change even though you assign a new value to webSeries in the surrounding environment.
Both functions and closures are reference type. So, if we take a copy of closure, that copy shares the same capturing values as its original.
Explain @escaping, @nonescaping and @autoclosure?
These attributes are applied to closures passed in as parameters to function. Closure parameters are @nonescaping by default. A non-escape closure tells the compiler that the closure you pass in will be executed within the body of that function and nowhere else. When the function ends, the closure will no longer exist in memory.
Escaping closures are those whose invocation escapes the scope of the function to which they are passed as an argument. One way they can escape is by being stored in a variable outside of the function.
completionHandler is assigned in a variable outside function scope and later invoked after the function is returned. As a result, the compiler throws an error demanding to add @escaping before type of completionHandler.
Line 7 — Assigning non-escaping parameter ‘completionHandler’ to an @escaping closure
An escaping closure that refers to self needs special consideration if self refers to an instance of a class. Capturing self in an escaping closure makes it easy to accidentally create a strong reference cycle.
@autoclosure attribute enables us to define an argument to a function that gets automatically wrapped within a closure. This resulting closure doesn’t take any parameters and when it’s invoked, it returns the value of the expression that’s wrapped within it. Primarily used to defer the evaluation of an expression until it’s needed, rather than doing it when the argument is passed.
In this implementation of the assert function, 4 > 0 & 4 < 6 expressions will be wrapped in a closure and evaluated only when this closure is invoked instead of while passing them as an argument.
Why escaping closures can’t capture mutating self for structs and enums?
Within a mutating function, a mutable version of self is provided which is similar to inout parameters to a function. Modifications to this copy of self are written back to the original one when the function returns. If an escaping closure implicitly captures this mutating self and do some changes, those changes won’t be reflected in the original copy and lead to confusion. Similarly inout parameters can’t be captured in an escaping closure. To put this in words of swift proposal SE-0035,
Capturing an inout parameter, including self in a mutating method, becomes an error in an escapable closure literal unless the capture is made explicit (and thereby immutable).
We have covered most of the stuff related to closures here. Next story we’ll cover Higher-order functions. Keep following for updates when these parts get published. Drop a comment in case you have an interesting closure interview question.
I hope you find this story helpful. If you liked it, share this with your community and feel free to give your claps below 👏 to help others find it! Thanks for reading.
What’s next to read ?
Get notified every time we post a new story to our publication. Follow us now
We are dedicated to our goal to help every iOS developer grow and give their best in the interview. Every week we’ll be coming up with newer topics. Don’t miss them. Signup Now. ✉️
Swift — Functions & Closures — Part II was originally published in Hash Coding on Medium, where people are continuing the conversation by highlighting and responding to this story.
]]>Hacking the iOS Interview
Swift — Initialization
Initializations in Swift can be asked in interviews with respect to both structs and classes. While this concept is relatively easier to understand when it comes to structs, however, things can get a bit tricky when answering questions regarding classes. We need to be aware of the 2-phase initialization for classes along with the convenience and designated initializers. Here, I will try to cover the questions which can be asked in the interviews, so make sure to bookmark this post!
Difference between convenience vs designated initializers?
Both convenience and designated initializers are related to classes. Designated initializers initialize all the stored properties of a class and then move up to the superclass to initialize all its properties:
Usually, a class will have only a single designated initializer.
The convenience initializer does not initialize all the stored properties of the class. However, it will rely on other initializers present in the class to initialize the stored properties of that class with some default values.
Why are convenience initializers provided, when we already have designated initializers?
The convenience initializers act as a secondary initializer, and these are used in those scenarios where it is not required for the caller to provide all the initial values of that class at the time of initialization. The caller will use these initializers to create the instance by providing only some of the stored properties, and the rest of the properties will be initialized with the default values provided inside that same class.
Does Swift provide convenience and designated initializers for structs as well?
As inheritance is not supported in structs, Swift does not provide convenience and designated initializers for structs. However, a custom initializer in a struct can call other initializers present in the class, and these initializers are called delegating initializers.
What are delegating initializers?
Delegating initializers of a struct are those that call other initializers of the same struct. Delegate initialization is useful when you want to provide an alternate initializer argument list but you don’t want to repeat the logic that is in your custom initializer. Also, using delegating initializers helps reduce the amount of code you have to write.
Will the below-given code compile?
It will not compile as a convenience can call another convenience initializer, but eventually, the chain of convenience initializers has to end up with a call to the designated initializer.
Explain initializer delegation for class types?
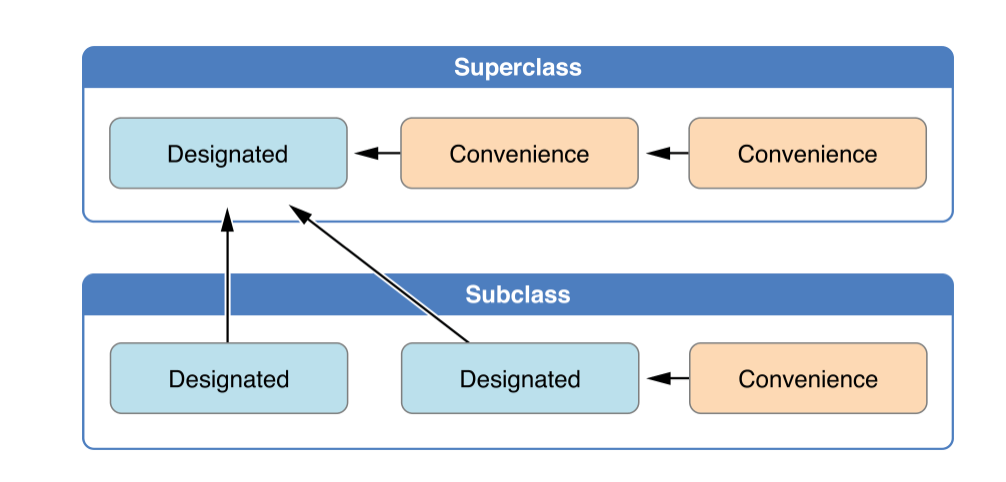
It becomes easier to remember the initializer delegation rule for class types after seeing the above image. It can be summed up in two categories:
- Convenience initializer delegates across the class:
This means that a convenience initializer can only call other initializers from the same class but cannot call the initializers of the superclass. - Designated initializer delegates up the class hierarchy:
It means that it becomes the responsibility of the designated initializer to call the initializers of the superclass so that the stored properties of the parent class can be initialized. But at the same time, the designated initializer cannot call a convenience initializer of the superclass.
Explain Two-Phase initialization in Swift
Two-phase initialization in Swift is explained very clearly in Swift’s official documentation:
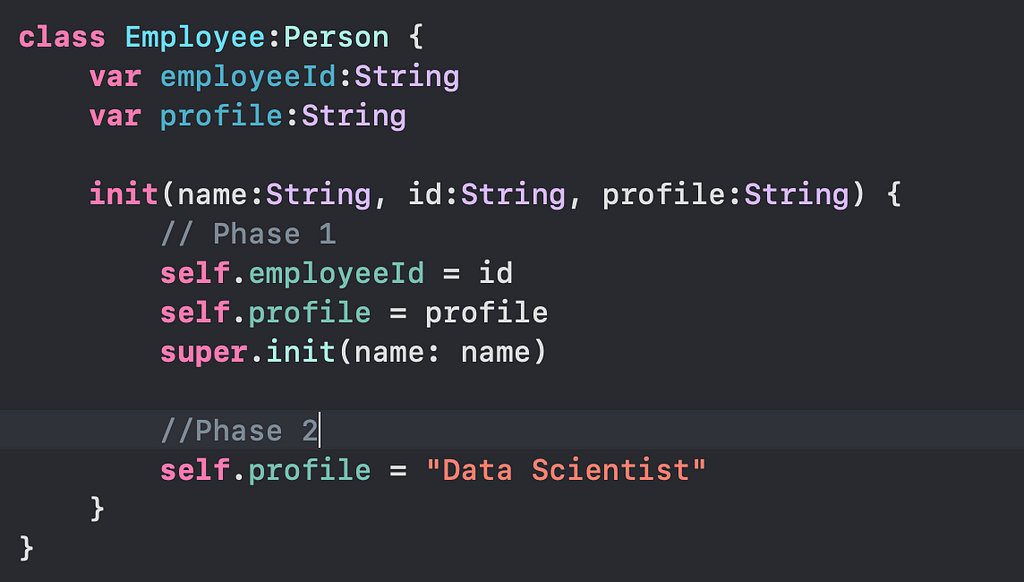
Class initialization in Swift is a two-phase process. In the first phase, each stored property is assigned an initial value by the class that introduced it. Once the initial state for every stored property has been determined, the second phase begins, and each class is given the opportunity to customize its stored properties further before the new instance is considered ready for use.
This can be seen in the below code example:
What are the compiler rules to support two-phase initialization?
There are four rules, which if not satisfied, the compiler will not let the code compile. These are important because it helps in preventing the accessing the store properties before they are initialized. The rules can be summarised as below:
- A designated initializer must ensure that all of the properties introduced by its class are initialized before it delegates up to a superclass initializer.
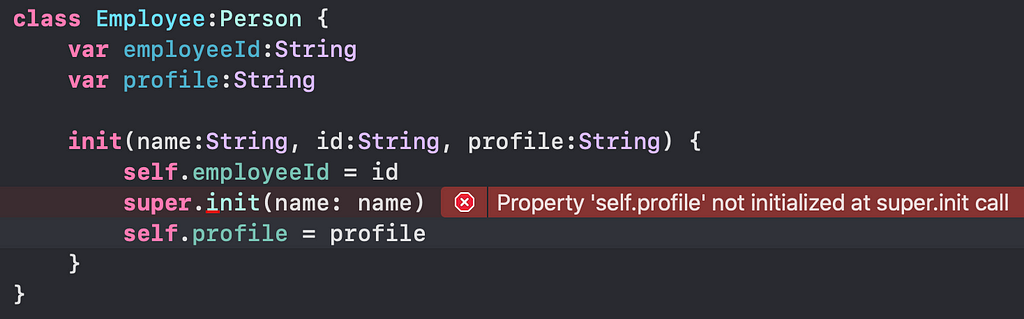
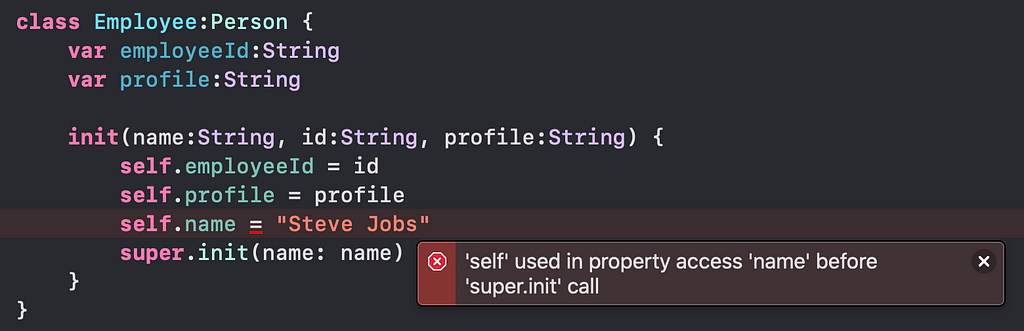
- A designated initializer must delegate up to a superclass initializer before assigning a value to an inherited property. If it doesn’t, the new value the designated initializer assigns will be overwritten by the superclass as part of its own initialization.
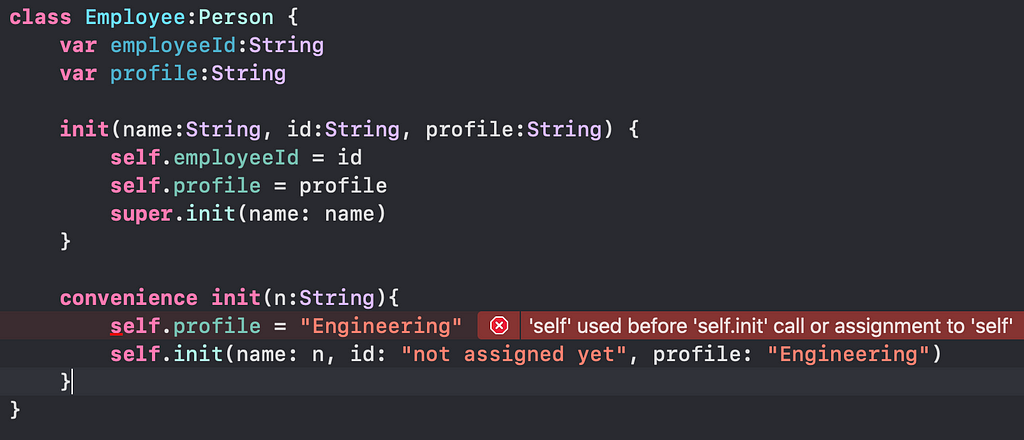
- A convenience initializer must delegate to another initializer before assigning a value to any property (including properties defined by the same class). If it doesn’t, the new value the convenience initializer assigns will be overwritten by its own class’s designated initializer.
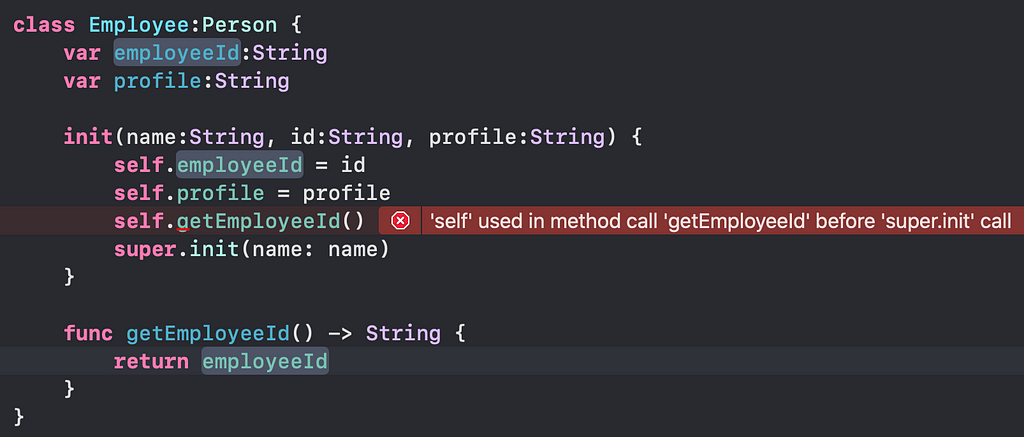
- An initializer can’t call any instance methods, read the values of any instance properties, or refer to self as a value until after the first phase of initialization is complete.
What are memberwise initializers?
I have explained the answer to the above question in my earlier post: Swift — Structs vs Classes — Part I. You can refer to the same, and can also go through the other interview questions based on structs vs classes in the same post.
What are failable initializers?
There can be certain situations, which if not satisfied, should not result in the formation of a concrete instance — be it a class, a struct, or an enum.
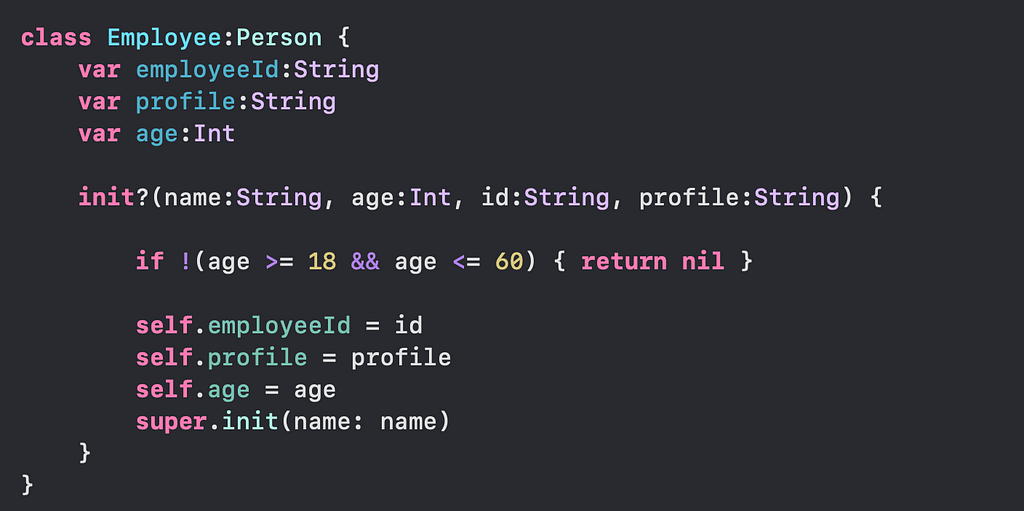
The interviewer can give you a situation based on the Employee class. He can ask to design a code in such a way that the caller cannot initialize the Employee instance if the age of the employee is less than 18 or greater than 60.
We can add a failable initializer to the Employee class as given below in the example:
What are required initializers?
Required initializers are those initializers that are supposed to be overridden by each and every subclass of that class.
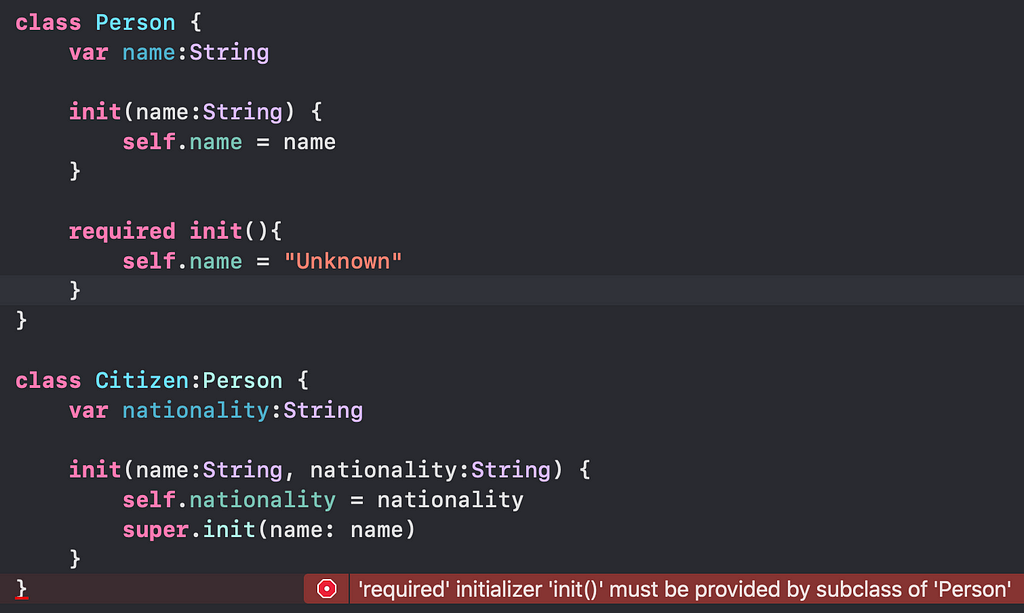
Next, following up on the required keyword, the interviewer can ask about the explanation of the error shown in the below code:
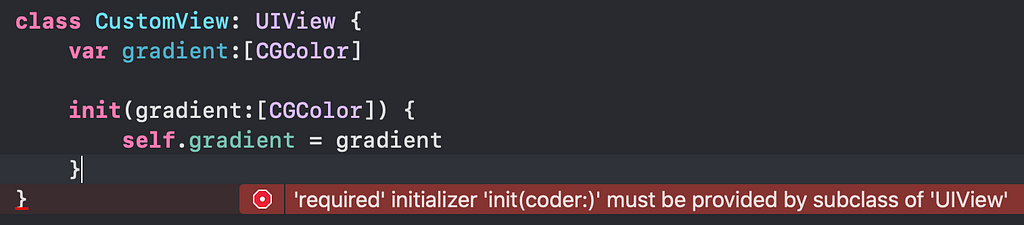
You must have observed that when you create a subclass of UIView, the compiler forces you to implement init(coder:). When you create the CustomView’s instance using Interface Builder, the method init(coder:) is called so that any custom initialization can be done here.
I hope you find this story helpful. If you enjoyed it, share this with your community, and feel free to hit the clap button below 👏 to help others find it! Thanks for reading. 👍
What’s next to read?
Get notified every time we post a new story to our publication. Follow us now
We are dedicated to our goal to help every iOS developer grow and give their best in the interview. Every week we’ll be coming up with newer topics. Don’t miss them. Subscribe Now. ✉️
Swift — Initialization was originally published in Hash Coding on Medium, where people are continuing the conversation by highlighting and responding to this story.
]]>Hacking The iOS Interview
Swift — Access Control

Access controls are mostly asked when you are halfway through your technical interview. The interviewer wants to know whether you can identify critical pieces in your code and whether you ensure that those code pieces are hidden or exposed accordingly to other parts of your codebase.
What are Access Controls in Swift?
Swift provide five different types of access controls within your code. These access levels restrict access to parts of your code from code in other source files and modules. These are relative to the source file in which any entity can define(entity e.g properties, methods, types and so on, and module e.g which can be shipped as a single unit in an application such as target or any framework).
- Open — This is where you can access all data members and member functions within the same module(target) and outside of it. You can subclass or override outside the module(target).
- Public — This is the same as open, the only difference is you can’t subclass or override outside the module(target).
- Internal — This is the default access level in Swift, it allows all data members and member functions to be accessed within the same module(target) only and restrict access outside the module(target).
- Private — This is where you can access data members and function within its enclosing declaration as well as an extension within the same file. It does not allow access in a subclass with in the same file or in another file.
- File-private - This is the same as private, the only difference is it allows access in a subclass with in the same file.
What is the default access level in swift?
If we don’t mention an access level before any entity, it is internal by default. It’s explained in the above section.
Access Modifier Comparison
The interviewer generally ask you the differences between various access modifiers, for example:
- open vs public
- public vs internal
- private vs fileprivate
Explain the difference between Open vs Public — (least restrictive)
public - you cannot subclass public entity outside the module(target) but in open you can inherit a class or override a method.
When using public modifier while creating a class inside a framework, we can not inherit that class inside another module(target) as can be seen in the below given example:

Now In the below example, we have NetworkFramework imported in the app’s target and we try to subclass the NetworkManager into loginNetworkManager

Similarly, while using public methods in another module it will give the compiler error:
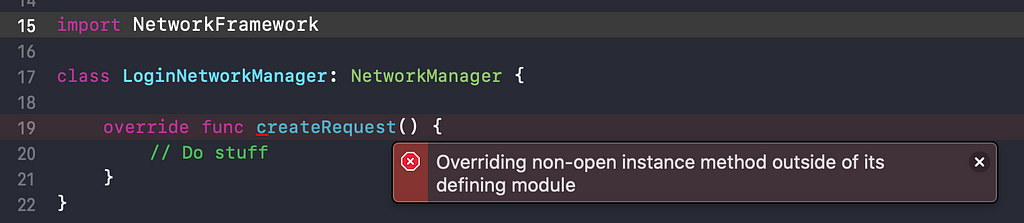
As we can see the compiler gives an error. To remove this error we will have to upgrade the access modifier from public to open. Now it will work fine.

You can be asked to write the code as shown in the above example in the interview.
Explain the difference between Internal vs Public?
Public — access enables data members to be used within any source file from their defining module, and also in a source file from another module that imports the defining module
Internal — access enables entities to be used within any source file from their defining module, but not in any source file outside of that module.
When should we use the internal access level?
When we want to create a framework in which we don’t want to allow classes and their entities to be accessed from other framework or module then internal plays an important role. This can be explained more clearly to the interviewer using an example like the one given below:

Now, if we try to use this class in any other module then it will generate compiler error as shown:

Explain the difference between Private vs Fileprivate — (most Restrictive)
We should explain the difference using the below cases with a real example:
private — Allow access data members and function within its enclosing declaration as well as an extension within the same file
Case 1: Within the same source file, if property or function is declared as private in class — then the scope is by default the class and extension of that class only.
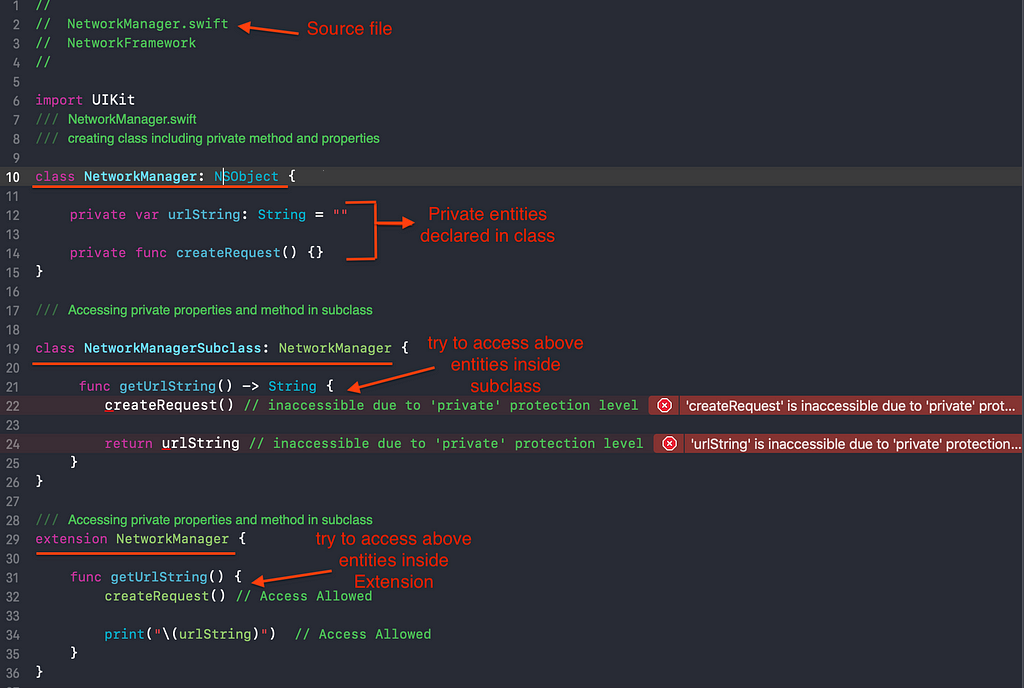
So, can we access data members inside the subclass?
No, the subclass is not allowed to access those data members defined in the superclass within the same source file as shown above.
Case 2: In the different source file, If property or function is declared as private in one source file and access within extension/subclass in another source file — access not allowed
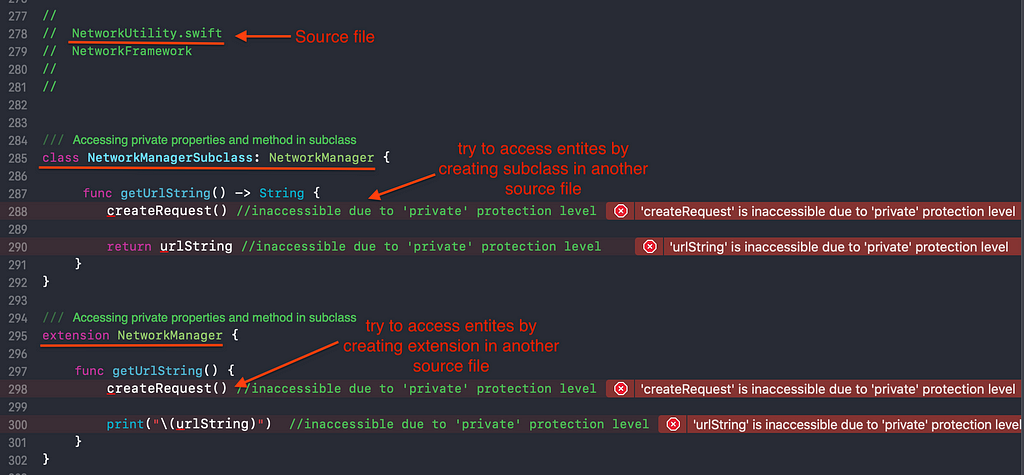
So here, we have seen the compiler error which clearly says “properties are inaccessible due to private protection level” now we can resolve this error by using fileprivate. Let’s see an example:
filePrivate — Allow access data members and functions within the same source file either in subclass or extensions
Case 1: Within the same source file, If we create an extension or subclass with in the same class file and try to access fileprivate entity in its extension/Subclass — access allowed
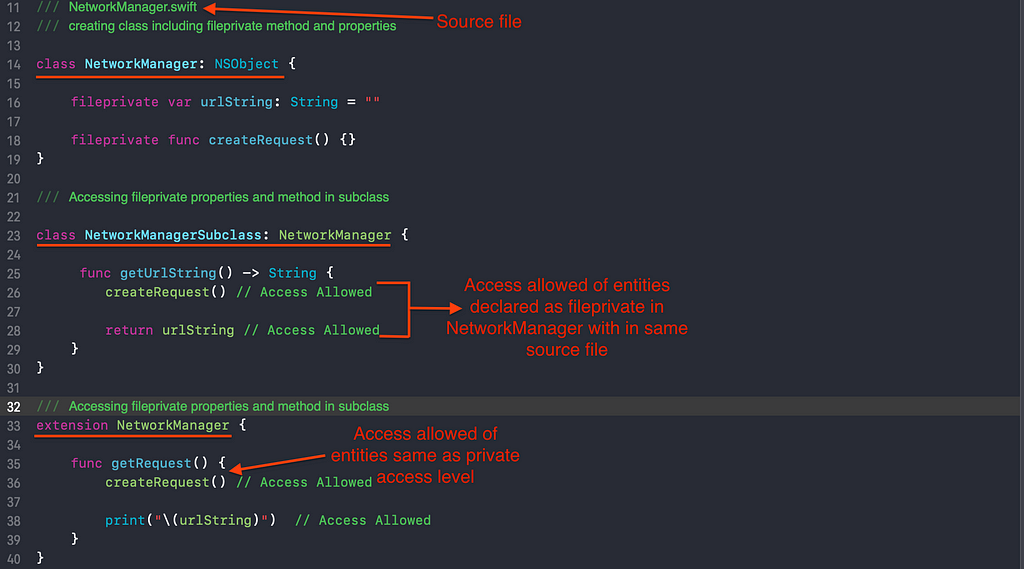
So as seen in the private access level there was an error while created subclass within the same source file here we have resolved that error by declared data members as fileprivate.
Case 2: In the different source file, fileprivate behaves the same as the private modifier as shown in the below example:
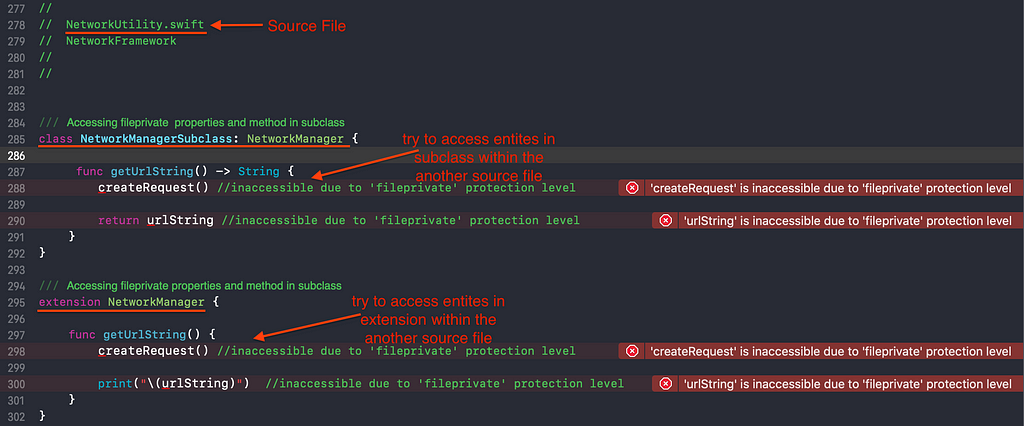
Here, the compiler error is generated as fileprivate says that you can access the data members within the same file in which they are declared while private says that you can only access data members within enclosing declaration scope and extensions.
Where can we apply access levels?
The interviewer can ask this question in a way that can we use modifiers in enum or struct?
- Classes, structs, enumerations, protocols
- Properties, functions, computed properties and subscripts
- Custom types, and nested types
How do Access levels work with tuple?
Tuple types don’t have a standalone definition in the way that classes, structures, enumerations, and functions do. A tuple type’s access level is determined automatically from the types that make up the tuple type, and can’t be specified explicitly.
Let’s see the example in which we try to show you that tuple considered as one of the properties in the class.

It clearly says that all the member inside tuple determined automatically with the same type which declared in the property
The below question can be asked in multiple-choice type questions:
For example, if you compose a tuple from two different types, one with internal access and one with private access then what will be the access level of that tuple?
The access level for that compound tuple type will be private.
Because the most restrictive access level is applied in that case to compound tuple so in this case private is the most restrictive access level.
I hope you find this story helpful. If you enjoyed it, share this with your community and feel free to hit the clap button below 👏 to help others find it! Thanks for reading. 👍
What’s next to read?
Get notified every time we post a new story to our publication. Follow us now
We are dedicated to our goal to help every iOS developer grow and give their best in the interview. Every week we’ll be coming up with newer topics. Don’t miss them. Slide to Subscribe Now. ✉️
Swift — Access Control — iOS was originally published in Hash Coding on Medium, where people are continuing the conversation by highlighting and responding to this story.
]]>Hacking The iOS Interview
Swift — Functions & Closures — Part I

One of the favourite topics for an interviewer when it comes to finding an interviewee’s swift knowledge. A good grip on functions, closures and higher-order function related concept will provide you with an edge. This discussion would most probably open with a question of the difference between function and closure. Let’s start with the same.
What are functions and closures in swift ?
Functions are a self-contained piece of code that performs a specific task. They are referred to as first-class objects. Every function has a type, consisting of its parameter types and return type, which makes it easy to pass functions as parameters to other functions and to return functions from functions. They can be nested to encapsulate functionalities within other functions.
A combination of a function and an environment of captured variables is called a closure. They can capture and store references to any constants and variables from the context in which they’re defined. This is known as closing over those constants and variables. They are usually unnamed functions.
What is the closure expression ?
There are two ways of creating functions — either with the func keyword or with {}. Swift calls the later closure expressions. {} are a way to write inline functions in a brief, focused syntax. Closure expressions provide several syntax optimizations for writing functions in a shortened form without loss of clarity or intent.
Closure expressions { } can be thought of as function literal in the same way that [ ] and [ : ] are array and dictionary literal.
Here’s an extract from the book Advanced Swift by objc.io —
Remember, a closure is a function combined with any captured variables. While functions created with { } are called closure expressions, people often refer to this syntax as just closures. But don’t get confused and think that functions declared with the closure expression syntax are different from other functions — they aren’t. They’re both functions, and they can both be closures.
How closure expressions help brevity in swift ?
They use various compiler level inferences and shorthands to minimize the code to write while maintaining the intent. Let’s take an example of this simple function twice which returns double of its argument.
And here’s the same function is written using the closure expression syntax. Just like before, we can pass it to the map.
Closure expression syntax can be a lot more compact, we can boil down the above statements to its shortest form possible. Remember the rules against each step.
What would be the output of the following code ?
let someFunction = { $0 + $1 }This will show an error because the compiler is not able to infer the types of parameters. If you want to assign closure expressions to a variable, and the compiler is not able to infer types, this is when you’d have to lock down which specific types it’s operating on. A variable can’t hold a generic function — only a specific one.
let someFunction: (Int, Int) -> Int = { $0 + $1 }Function parameters are constants by default we can’t mutate them directly. If you haven’t read Swift — let vs var story, then it’s time to pause and have a look.
What is wrong with this code snippet ?
You can only pass a variable as the argument for an in-out parameter. This makes sense because we’re not allowed to mutate let variables.
Line 7 — Cannot pass immutable value as inout argument: ‘currentClaps’ is a ‘let’ constant
Furthermore, in-out is pass-by-value-and-copy-back, not pass-by-reference. They are an alternative way for a function to affect outside of the scope of its body. To quote The Swift Programming Language —
An in-out parameter has a value that’s passed into the function, is modified by the function, and is passed back out of the function to replace the original value.
In-out parameters can’t have default values, and variadic parameters can’t be marked as in-out.
Explain the issues with the below code snippet ?
You can use an inout parameter inside nested functions, but Swift will make sure your usage is safe. For instance, you can define a nested function (either using func or using a closure expression) and safely mutate an inout parameter. However, you’re not allowed to let that inout parameter escape. This makes sense, given that the inout value is copied back just before the function returns. If we could somehow modify it later, what should happen? Should the value get copied back? What if the source no longer exists? Having the compiler verify this is critical for safety.
Line 7 — Escaping closure captures ‘inout’ parameter ‘claps’
Why argument labels aren’t required in the function call when it is assigned to some variable ?
We must not include an argument label in the addTwoNumbers call, whereas add call requires the argument label. Swift only allows argument labels in function declarations; the labels aren’t included in a function’s type. This means that you currently can’t assign argument labels to a variable of a function type, though this will likely change in a future Swift version.
That’s mostly everything on functions in swift. The next part of this story will revolve around closures and after that one more part on Higher-order functions. Keep following for updates when these parts get published. In case you come across other important question do let me know in the response section.
I hope you find this story helpful. If you liked it, share this with your community and feel free to give your claps below 👏 to help others find it! Thanks for reading.
What’s next to read ?
Get notified every time we post a new story to our publication. Follow us now
We are dedicated to our goal to help every iOS developer grow and give their best in the interview. Every week we’ll be coming up with newer topics. Don’t miss them. Signup Now. ✉️
Swift — Functions & Closure — Part I was originally published in Hash Coding on Medium, where people are continuing the conversation by highlighting and responding to this story.
]]>Hacking the iOS Interview
Swift — Copy-On-Write Optimization

This concept can be asked as a follow-up question when discussing structs vs classes in Swift. If you haven’t gone through my previous posts on Structs and Classes, you can find them here: Part I and Part II.
What is Copy-on-Write Optimization in Swift?
As we know that value types can only have a single owner, therefore they need to be copied every time they are passed around. When we have a value type containing a lot of data, copying them each time (even when passing around) can lead to a lot of memory consumption. To mitigate this downside, the Swift compiler adds an optimization called copy-on-write.
Using copy-on-write, the compiler does not go on creating copies of the objects when they are merely being passed around among multiple variables, unless and until a variable tries to modify the data.
Write some code to explain Copy on Write using an example
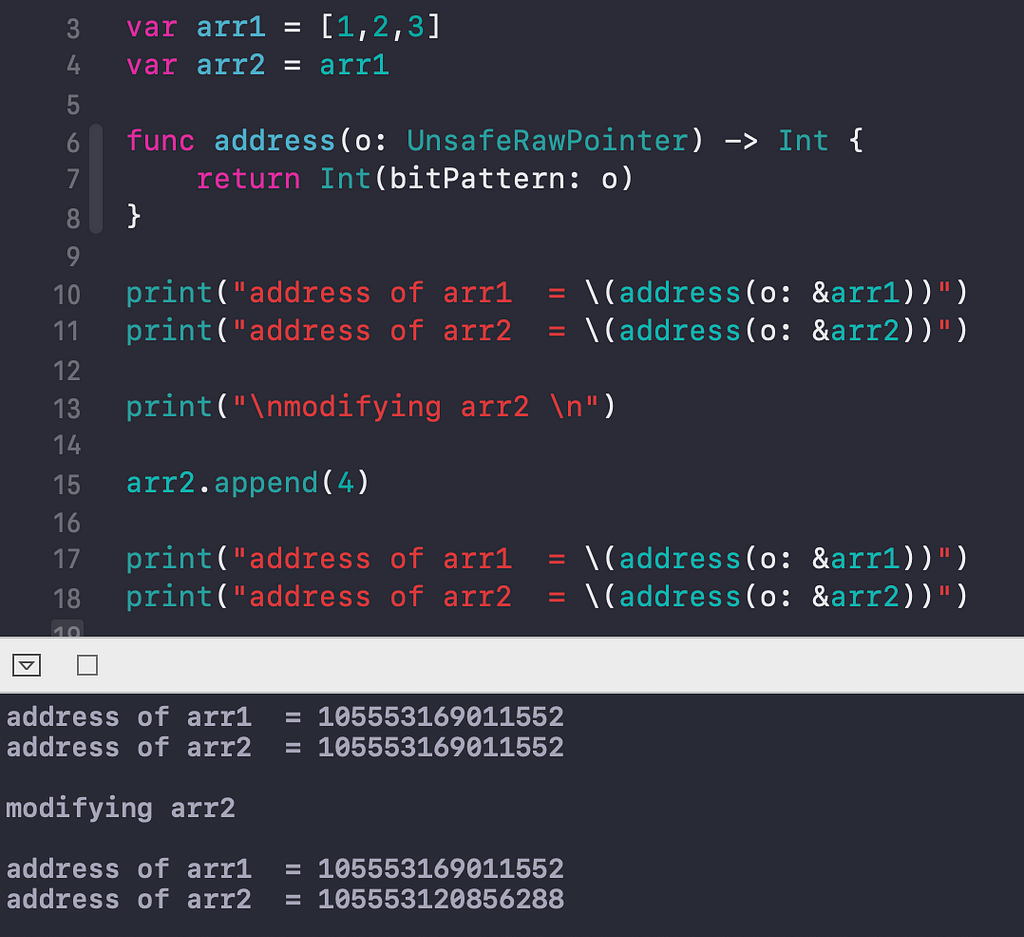
Swift arrays implement copy-on-write optimization, which means if we create an array and simply assign it to another variable (without any of the variables modifying the array), both the arrays will share the same reference to the underlying data.
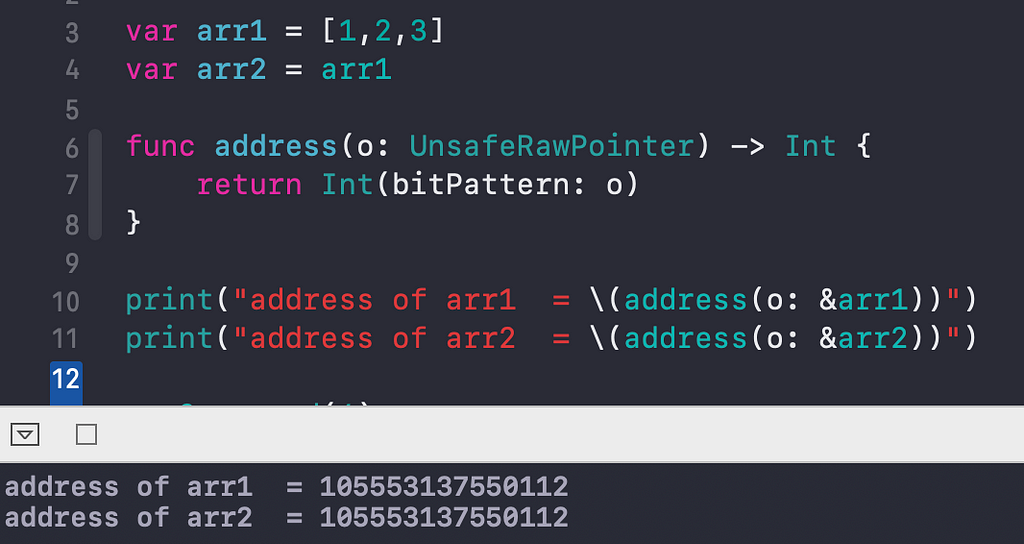
In the above example, we can see in the logs printed in the console that the memory address of both the arrays — arr1 and arr2 are the same.
Now when arr2 modifies the contents of the array, its memory address is updated and the memory address of arr1 remains the same as the previous one.
Is there any disadvantage of Copy on Write?
Since value types can only have a single owner, they don't have to incur the overhead of reference counting. But, the Copy on Write value types needs to internally maintain a reference count to be aware of the number of copies being created of that value. When a new copy is created, the internal reference count is also incremented.
Updating the reference count is a slow operation because it has to be thread-safe, and to achieve that, locking mechanisms are implemented internally, which have their own costs. Thus, if we are not careful, the performance can be adversely affected.
Let's consider the below-given sample code containing a struct called MediaItem which contains a string, a dictionary, and an array.
When passing this MediaItem’s objects around, the internal reference count of all the properties have to be maintained. This overhead will result in a decrease in performance.
How to implement Copy on Write for custom value types?
Following up on the above example of the MediaItem struct, we can make some changes in the code to reduce the overhead.
We can wrap the properties inside a private MediaData class as shown in the example below:
By wrapping the properties inside a class, the struct now has to maintain a single internal reference count when making a copy.
We can add new computed properties to expose name and data, and can be achieved using the below approach:
Using the above implementation we can achieve Copy-on-Write for our custom value types.
We have used a not-so-commonly-used method here of the Swift Standard Library:
isKnownUniquelyReferenced(_:)
Returns a Boolean value indicating whether the given object is known to have a single strong reference.
This method is used to efficiently check the Copy on Write implementation, as we need to know if the object has a single owner. If it doesn’t, we create a copy of the object before modifying it.
I hope you find this story helpful. If you enjoyed it, share this with your community, and feel free to hit the clap button below 👏 to help others find it! Thanks for reading. 👍
What’s next to read?
Get notified every time we post a new story to our publication. Follow us now
We are dedicated to our goal to help every iOS developer grow and give their best in the interview. Every week we’ll be coming up with newer topics. Don’t miss them. Signup Now. ✉️
Swift — Copy-On-Write Optimization was originally published in Hash Coding on Medium, where people are continuing the conversation by highlighting and responding to this story.
]]>Prepare for the best 🤟

No matter how good you’re at iOS development, interviews are always stressful. It’s hard to prepare and gather all resources over the internet. Furthermore, you never know what the interviewer will ask you. It always feels like there’s so much to prepare and you’re nowhere near the level needed to clear interviews. Is this your feeling? Don’t worry.
We have planned to curate this iOS interview preparation series to propagate those experiences that we got through tons of our interviews and gathered from our network. This includes companies like Flipkart, Walmart, Citrix, InMobi, Directi, Expedia, Gojek, PhonePe and many more to count. So, whether you’re the one looking to take the next step in your career, or whether you’re the one who is trying to hire someone in your team, I hope this series will have something you both can learn.
As they say, not every series is available on Netflix. Some exist on Medium.
We have questions ranging from basic Swift to expert level concepts of iOS development, architectures, design patterns and system design. We will try to cover all, just bear with us.
Swift
- let vs var
- Structs & Classes — Part I, Part II
- Copy-on-Write
- Functions & Closures — Part I, Part II
- Inheritance [ coming soon ]
- Access Control
- Initialization
- Protocols [ coming soon ]
- Generics [ coming soon ]
These are the kinds of questions we were asked but remember that different companies interview in different ways so your experience may vary. But at the least, this series makes sure you will be well prepared before going to an interview. That’s for sure. 👍
Every interview deserves its own unique experience.
We hope this curated iOS interview preparation series will help you land your dream job! We’ll be glad to hear your stories. Do share them with us.
Save this story on your medium and share it with your friends, help them find this great resource for their iOS interview preparation. Isn’t it what good friends do?
Claps on the medium are token of appreciation. They don’t have Bitcoin.
If you have any queries or suggestions, drop them below in the response. We’ll be more than happy to help you out.
Thanks, Shivam Pandey!
Get notified every time we post a new story to our publication. Follow us now
We are dedicated to our goal to help every iOS developer grow and give their best in the interview. Every week we’ll be coming up with newer topics. Don’t miss them. Signup Now. ✉️
Hacking The iOS Interview was originally published in Hash Coding on Medium, where people are continuing the conversation by highlighting and responding to this story.
]]>Hacking the iOS Interview
Swift — Structs and Classes — Part II

In this post, I will continue with some advanced questions related to structs vs classes in Swift. These become important topics in the iOS interviews as if we are not careful using these, then this can unintentionally lead to memory leaks as well as crashes in the app.
In case you missed the previous part, you can find it here: Swift — Structs and Classes — Part I.
Explain the lifecycle of struct vs class in Swift?
Understanding the lifecycle of structs and particularly classes become very important as the interviewer can ask about those scenarios which can lead to unintentional performance bottlenecks and crashes in the app.
Structs
Structs are value types, and so they don’t have multiple owners and therefore their lifecycle is relatively easier to maintain. Their lifetime is bounded to the lifetime of the variable containing the struct. The struct’s memory will be freed when the variable goes out of scope.
Classes
Classes can have multiple owners, therefore Swift uses ARC to keep track of the number of references to a particular instance. The Swift runtime calls the object’s deinit when the reference count becomes zero and the memory is freed.
Explain strong reference cycles in Swift
Reference cycles occur when two objects hold strong references to each other, and because of which both the objects never get deallocated, and thus cause memory leaks. Structs do not face this problem because being value types, there are no references to structs. But while dealing with classes we need to be careful about creating unintentional reference cycles.
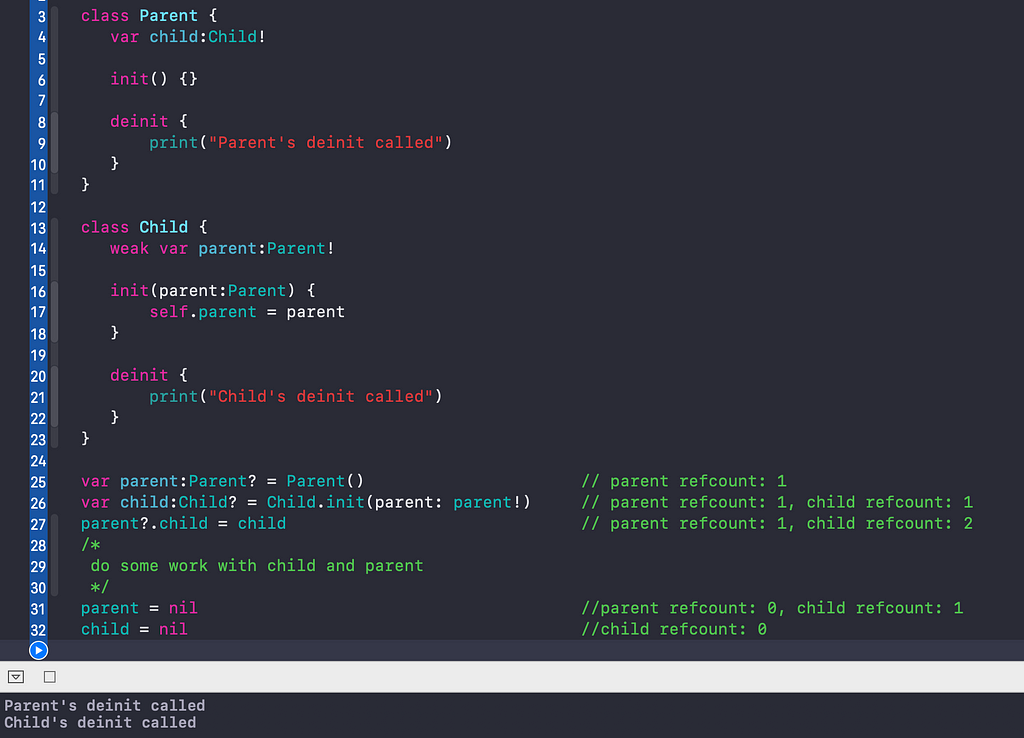
We can see the example of a strong reference cycle in the below example, where there is a Parent-Child relationship.
You can be asked to write some code similar to the above example to show a scenario in which a reference cycle can happen.
In line 27 and 28 even after setting both parent and child to nil, the deinit’s of both the objects are not called denoting that there is a memory leak. This happens because the reference count of both parent and child never goes down to 0.
To solve this problem, Swift has provided us with two options —
weak and unowned.
Weak vs Unowned in Swift?
Explain weak references
In the above example, we can break the reference cycle by making the child’s reference to the parent as weak. Assigning an object to a weak variable doesn't change its reference count.
Weak references must always be optional as the variable will automatically be set to nil once the referred object gets deallocated. We can correct the above code by making the parent property in the Child class as weak.
The weak references are generally used in delegate patterns in iOS.
Explain Unowned References
There can be certain situations where we want a non-strong reference that is not optional. For example, the child should always have a parent associated with it. Here, we can use the unowned keyword.
When using unowned, we have to ensure that the parent outlives the child. If the parent gets deallocated before the child, and the unowned variable is tried to be accessed, the program will crash.
This is because the Swift runtime keeps a second reference count in the object to keep track of unowned references. When all the strong references are gone, the object will release all of its resources (for example, any references to other objects). However, the memory of the object itself will still be there until all unowned references are gone too. The memory is marked as invalid ( also called zombie memory), and any time we try to access an unowned reference, a runtime error will occur.
What to choose between unowned vs weak?
- If we can ensure the parent is going to outlive the child, then we can choose the unowned reference. This will also give us the option to use that unowned reference as a let-constant as with weak reference we can only use an optional-var.
- If we cannot guarantee the lifetime of both or either of the references then we should use a weak reference, as unowned can cause the program to crash if we try to access that reference that has no other strong reference attached to it.
These are the major concepts and questions which can be asked in interviews. For additional information, you can always refer to the official Swift documentation for structures and classes.
If you like the content, save it on medium and share it with your iOS community and help us reach a larger audience who could use this. You can appreciate it as well. Clap or Claps. 👏 👏
What’s next to read?
Get notified every time we post a new story to our publication. Follow us now
We are dedicated to our goal to help every iOS developer grow and give their best in the interview. Every week we’ll be coming up with newer topics. Don’t miss them. Signup Now. ✉️
Swift — Structures and Classes — Part II was originally published in Hash Coding on Medium, where people are continuing the conversation by highlighting and responding to this story.
]]>Hacking the iOS Interview
Swift — Structs vs Classes — Part I

This forms a very common question for almost all iOS interviews. This is because it plays a significant role in choosing the right abstraction mechanism keeping both performance and modeling in mind. Questions can range from areas covering consistency of data as well as the performance of the app.
What are structs and classes?
Structs and classes are like a template or prototype that contains the variables and the methods common to all objects of that kind. These help in keeping the code organized for easier maintenance and reusability.
What are class only features in Swift as compared to structs?
- Inheritance: a class can inherit the characteristics of another class.
- Type-casting: helps in checking and interpreting the type of a class instance at runtime.
- Deinitializers: enable an instance of a class to free up any resources it has assigned.
- Reference counting: allows more than one reference to a class instance.
What are value types vs reference types?
- Value types: Each instance keeps an independent copy of its data, for example — structs, enums or tuples. Changing one instance will have no effect on the other.
- Reference types: Instances share a single copy of the data. Changing data in one instance will change the data for all the instances pointing to the same instance, for example — classes.
When to use struct vs class in Swift?
When creating a new model, we need to carefully contemplate the use cases of the model. Based on this, we should decide between structs and classes.
Use structs when:
- Comparing instance data with == makes sense
This means when only data needs to be compared, and memory locations of these data are not important.
In the above example, it is important to compare the value of the NetworkRequest’s urls and not the memory addresses.
- You want copies to have an independent state
Take the above example and modify it a little by assigning request1 to request2, and changing the url of request2 only.
We can see that both the requests have different urls as each request have a different copy of the urls.
- The data will be used in code across multiple threads
When passing and copying the value types in a multi-threaded environment we can be sure that each context will have a separate unique copy which will not impact the others. This can help avoid a lot of unintentional bugs.
Use classes when:
- Comparing instance identity with === makes sense
- You want to create a shared, mutable state
If we want to share the state among the threads and variables then use classes.
Where are structs and classes allocated in memory?
Structs are allocated in the stack memory.
References of the class objects can be created on the stack but all the properties of that class’ object will be kept in the heap.
Reference counting in classes vs structs?
Since classes support heap allocations they need to maintain reference counts for allocating and deallocating objects.
Structs do not need reference counting. However, if structs contain references then they would incur twice the number of reference counting overhead as compared to a class.
Method Dispatching in classes vs structs?
Classes use method dispatch. But if a class is marked as final, the compiler will use static dispatch.
Structs use static dispatch.
What are memberwise initializers?
Memberwise initializers are those initializers which the compiler generates automatically for structs. We can initialize a struct’s object using these initializers even though we have not provided any custom initializers.
The order of the arguments in these initializers is decided by the order of the declared properties in the struct.
However, if we write any custom initializer, the compiler will not generate the memberwise initializer.
If we want both memberwise and custom initializers, we should add the custom initializer in the extension of that struct.
Also, I would suggest iOS developers to read the official Swift documentation to know more about the initialization process in Swift.
What is the “mutating” keyword in Swift and when is it used?
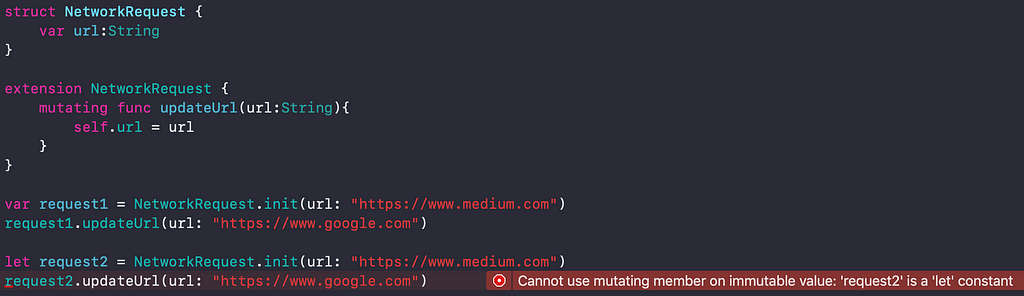
When we have to change any property of a struct, we should use the mutating keyword before the func keyword when defining a method. This is because the self parameter that’s implicitly passed into every method is immutable by default.
Within a mutating method, self is passed as a var. The mutating keyword helps the compiler to decide which methods cant be called on let constants. If we try to call a mutating method on a let variable, the compiler shows an error.
It’s just tip of the iceberg. I have a lot to cover on this topic, so divided this story into two parts. Many advanced concepts and questions of structs and classes in swift can be found here: Swift — Structs and Classes — Part II.
Apart from this, one should also be aware of Swift’s Copy on Write optimization when dealing with value types, and how we can implement Copy on Write for our own custom types.
Keep following!
If you like the content, save it on medium and share with your iOS community and help us reach a larger audience who could use this. You can appreciate it as well. Clap or Claps. 👏 👏
What’s next to read?
Get notified every time we post a new story to our publication. Follow us now
We are dedicated to our goal to help every iOS developer grow and give their best in the interview. Every week we’ll be coming up with newer topics. Don’t miss them. Signup Now. ✉️
Swift — Structures and Classes — Part 1 was originally published in Hash Coding on Medium, where people are continuing the conversation by highlighting and responding to this story.
]]>Hacking the iOS Interview
Swift — let vs var

At first, it looks like a trivial question of Swift language. But this might lead to discussions around language semantics and its mutability/immutability in general. You have to be ready for this deep dive.
What are let and var ? What is the difference between them ?
Both let and var are for creating variables in Swift. let helps you create immutable variables (constants) while on the other hand var creates mutable variables. Variables created by both of them either hold a reference or a value.
The difference between them is that when you create a constant using let you have to assign something to it before the first use and can’t reassign it. And when you declare a variable with var it can either be assigned right away or at a later time or not at all and can be reassigned at any time.
Can we mutate function parameters ?
Function parameters are constants by default. Trying to change their value within functions body results in a compile-time error.
Line 2 — Cannot assign to value: ‘value’ is ‘let’ constant.
Have you ever wondered why function parameters are not variables? Find out here
Can you help compile this code? Explain the cause of compile-time errors, if any.
Structs have value type semantics in Swift. Whenever you try to mutate them, they get copied with mutation applied to them and reassigned back.
The let variables holding struct can’t mutate it as it would mean you are mutating value of the immutable variable which can not happen in Swift. On the other hand, the var variable holding struct can mutate itself. Similarly, the rule of let & var will apply to individual properties of the struct.
Line 7 — Cannot assign to property: ‘constantBlog’ is a ‘let’ constant.
Line 8 & 12 — Cannot assign to property: ‘claps’ is a ‘let’ constant.
Where do you think compile-time errors would be present in this code?
Classes have reference type semantics in Swift. Whenever you try to mutate them, the object stored elsewhere in memory gets mutated while the reference to it remains the same.
You can modify a class’s members whether or not the variable referencing it is mutable.
Line 13 & 17 — Cannot assign to property: ‘claps’ is a ‘let’ constant.
The whole point is that your interviewer wants to dig deep for your understandings of how mutation works in swift. What can be mutated and what not.
I hope you find this story helpful. If you liked it, share this with your community and feel free to give your claps below 👏 to help others find it! Thanks for reading.
What’s next to read?
Get notified every time we post a new story to our publication. Follow us now
We are dedicated to our goal to help every iOS developer grow and give their best in the interview. Every week we’ll be coming up with newer topics. Don’t miss them. Signup Now. ✉️
Swift — let vs var was originally published in Hash Coding on Medium, where people are continuing the conversation by highlighting and responding to this story.
]]>