
Today I was writing some code for a client that was using PromiseKit, a third-party library similar to Combine for handling async operations. Basically PromiseKit is working with Promise objects, hence the name, and each Promise is something that will be fulfilled later on (useful for async operations) - similar to Future for Combine friends.
So in PromiseKit there is a function called when(..) that takes as parameter many Promises inside, and it appears to accept any number of Promises, similar to a variadic argument where you can pass as many Promises as you want.
The compiler error
Little did I know, until I added a sixth parameter, and the compiler was nagging about the when() function. It was giving me an error because it could only support up to 5 arguments.
So I took a look at the library and I saw this.
The reason the arguments are generic is because a promise can carry any type. E.g Promise<Int> or Promise<String>

The Naive Solution
Instinctively, my first thought was to contribute to the library by adding a new function with 6 generic arguments. But.. what if later we need 7?
But wait a second, this looks like repetitive code, it sounds overkill to have to implement a new function for each parameter count number.
Hello Parameter packs
This got me curious, so then I searched and I found out that from swift 5.9+ we are able to use a new feature called parameter packs (or variadic generics)
And all the code you see above could basically be replaced by the following:

Wow, that was my first reaction when I finished writing that, first of all it looks like it is not swift at all because of the new keywords. Well, let’s see this together.
First let’s analyze the function signature.
The when() is a generic function because we see the <> characters.
”<each U: Thenable>” declares a type parameter pack, a placeholder for one or more types. The number of parameters will be decided at the call site (inferred later from the function parameters). The
: Thenableconstraint ensures each type in the pack conforms to the Thenable protocol.“repeat each U“ is where the pack expansion happens, this allows the compiler to expect from 0 or more generic arguments as parameters on call site. For example if caller uses 3 parameters the equivalent without parameter packs would be “_genericParam1: U, _ genericParam2: V, _ genericParam3: W“.
The return is also using pack expansion. It expands into a
Promisewrapping a tuple of each promise's resolved type. For example, if you passPromise<Int>andPromise<String>, the return type becomesPromise<(Int, String)>."
Now that we have covered the function signature we can continue with the implementation. As you can see we are using
repeat voidPromises.append((each fulfilled).asVoid())

// Which is equivalent to
voidPromises.append((parameter1).asVoid())
voidPromises.append((parameter2).asVoid())
voidPromises.append((parameter3).asVoid())
....
The rest is just PromiseKit internal implementation so it’s skipped from this article.
And that’s how powerful the compiler can be.
When Will You Need This?
Now you might be wondering, “how often will I actually need this?”
Honestly, in a typical iOS codebase, probably never. But if you are building a library, parameter packs can save you from maintaining dozens of overloads and your users from hitting arbitrary argument limits like I did.
If you are interested in learning more I would recommend taking a look at the following WWDC.
Thanks for reading, feel free to share your thoughts in the comment section see you in the next article 👋🚀
await nextArticleCodingWithKonsta()

Don’t worry zombie apocalypse hasn’t happen yet🧟♂️
But after reading this article, you’ll learn a new metric for assessing the real quality of your unit tests.
I’ve worked on teams where code coverage was considered one of the most important metrics. And yet, even as coverage increased, the codebase didn’t necessarily become healthier.
In this article, I’ll introduce a metric that measures something code coverage doesn’t… 👇
Code-Coverage
Every’s developers nightmare is to ship a bug in production. A strong CI pipeline and a reliable test suite builds confidence and speeds up deliveries.
And reliable is the key word here.
A good friend and coworker once told me:
If you want to introduce something to the team, it needs to be measurable.
So that raises an important question:
How do you measure whether your tests are actually good or bad? 🤔
Do you just wait until customers start complaining about bugs they find?
Code coverage may look great on paper…but reliability is what actually protects production.
There has to be a better way…
The problem becomes even worse if your team is scaling up. How do you know that tests written are reliable? And then… you end up with having many regression bugs although you’ve hit your code-coverage team goal 😱
Mutation Testing
Mutation testing is not a mobile-only concept.
After reading this article, ask your backend, web friends if they use it.
Konsta what is this about? Is this just a fancy name? Give me an example.
Sure, and let me explain, in order to do this type of test you need a mutant.
A mutant is a change (a bug) that you create in your codebase by changing your production code.

What kinds of mutations exist?
Mutants are usually small, realistic changes such as
swapping operators (>= → <)
flipping logical expressions (&& → ||)
replacing constants (true → false)
deleting function calls, especially when return values are discarded.
Once the mutant is inserted, we run the test suite.
If test suite failed it’s a good sign and it means that mutant was eliminated (this increases the mutation score.) This happens when there is a test case that is testing against the age < 18.
If tests succeeded means that mutant survived and this lowers the mutation score. (which implies there was no test that captured the bug/mutant we introduced above)
ℹ️ The mutation score is:
eliminated mutants / total mutants
A mutation score of ~0% in code-covered areas probably means the tests are… 🗑️😅
Now, we’ve described the process for a single mutation. But how do we generate many mutants automatically and summarize the results in a clean report?

Muter CLI 🧟
Automated mutation testing for Swift
https://github.com/muter-mutation-testing/muter
It’s really easy for anyone to use:
Install the CLI via homebrew
Provide a muter.conf.yml (this tells Muter how to run your tests)
Run it on your most important files and see how well tested they are 🤞
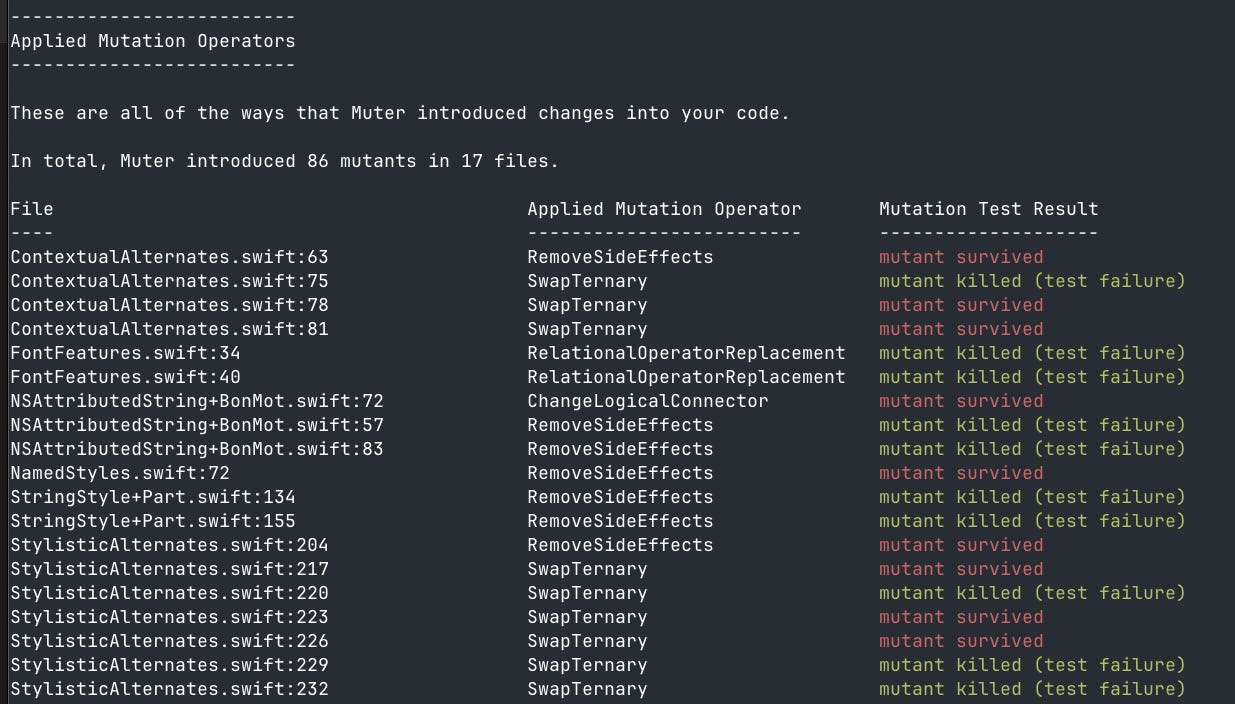
Muter gives a detailed report that you can use to understand the weak spots on your test.

This can also be applied on the CI level to run on changed files. This can give valuable feedback to the reviewer/author. This is possible with the --files-to-mutate flag.
Practical Advice
One important thing to keep in mind. Mutation testing can become slow depending on how many files you mutate.
So I recommend starting small ✅ run it selectively on files with heavy business logic first instead of trying to mutate your entire codebase from first run.
Last thoughts 💭
Mutation testing is still not very popular in the Swift community, especially compared to ecosystems like JavaScript..
But I genuinely believe it provides that “extra something” an additional layer of confidence when writing tests (whether you write them yourself or with a little help from AI 😅).
I hope in the future Xcode support more customization so that mutation score was an option on Xcode to show directly in editor as codecoverage is doing already.
Once you start thinking in terms of “would my tests actually catch a bug?” instead of just “did this line execute?”, it becomes clear why mutation testing is such a powerful addition to your testing toolbox.
Looking ahead to hear your thoughts and ideas
See you in the next article 🚀
Konstantinos Nikoloutsos
]]>
Before I start, happy new year to you and your families🎉.
New year, new goals, new job listings…, and I want to make sure you are ready for them 🎯
The Problem: The “Invisible” Work 👻
I was scrolling through LinkedIn recently and noticed:
many job descriptions ask for an "active GitHub account".
Recruiters often use that green contribution graph as a quick "pulse check" to see if a candidate "loves writing code 🧑💻"
But here is the reality: many of us work for companies that use Azure DevOps, Bitbucket, or internal GitLab instances (I know the pain 🤮). You might be writing high-quality code for 8+ hours a day, but because it’s not on your personal GitHub account, your profile looks like a The Upside Down from stranger things 😈.
When a company has hundreds of candidates to screen, an empty graph might be the reason you may not pass the initial screening phase 😞
Let’s make our commit Graph Greener 🟩
Disclaimer: Please don’t tell recruiters about this 😅
Make a private repository on Github and clone it locally.
Open terminal and make your first commit (e.g on january first of 2025)
git commit --date=1735689600 -m "⏮️⏰"
(* The magic number is the timestamp 👆)
Yea that’s it, now if you “git log” you will see a commit on 01/01/2025, congrats 👏 Well now you know what’s the next step, just iterate step 2 with different timestamp 🔁
Once you finish, push the changes. and enjoy an increased interview success rate.
My best friend Claude Code already create a simple script that you can find in the end of this article (anthropic ❤️)
Bonus Points: The Artist’s Touch 🎨
For the creative people in our community, you can take this even further. By precisely timing your commits, you can actually "draw" on your contribution graph or even spell out your name. It’s a fancy way to impress someone 🚀
For doing that I recommend using this open source-library.

Let’s be realistic 🦉
Now that I drew your attention about git, let’s be honest, git is a power-tool.
If you don't know how to handle a rebase, fix a conflict, or manage a new release, your "green graph" is a lie that will be exposed in the first week of your new job.
In the upcoming post I will share with you some of my must-have git commands that everyone should know.
Let’s make our profiles look pro, but let’s make our skills undeniable 💪
Konstantinos Nikoloutsos
| #!/bin/bash | |
| # Starting timestamp: January 1, 2025 00:00:00 UTC | |
| start_timestamp=1735689600 | |
| # Ending timestamp: January 1, 2026 00:00:00 UTC | |
| end_timestamp=1767225600 | |
| # Current timestamp | |
| current=$start_timestamp | |
| # Counter for commit messages | |
| counter=1 | |
| # Loop through timestamps | |
| while [ $current -le $end_timestamp ]; do | |
| # Create a dummy change | |
| echo "Commit $counter at timestamp $current" >> activity.txt | |
| # Stage the change | |
| git add activity.txt | |
| # Commit with custom date | |
| git commit --date=$current -m "Activity commit #$counter" | |
| echo "Created commit #$counter for timestamp $current" | |
| # Generate random increment between 0.6 and 2 days in seconds | |
| # 0.6 days = 51840 seconds | |
| # 2 days = 172800 seconds | |
| # Range = 172800 - 51840 = 120960 seconds | |
| random_increment=$((51840 + RANDOM % 120961)) | |
| # Increment timestamp by random amount | |
| current=$((current + random_increment)) | |
| counter=$((counter + 1)) | |
| done | |
| echo "Done! Created $((counter - 1)) commits" | |
| echo "Run 'git push' to push to your repository" |

How angry 😤 would you be if you tried to understand what a function does and it returned Any?
func nextScreen() -> AnyWhen you see a method, you usually have a few seconds to understand it at a high level based on its signature. You look at:
the name, scope
the parameters
the return type (+ whether it’s async or not 😅)
The problem with throws
Traditionally in Swift, a throwing function looks like this:
func makeSantaGift(kidName: String) throws -> GiftBut the function signature doesn’t tell you. The error type is effectively any Error 😩
Typed throws to the rescue 🎄
Starting with Swift 6.0, Typed Throw jumped in.

Function’s signature is enhanced (1) (2) with more information.
The compiler now knows all possible error cases. And exhaustivity is the best part 👇


It's still a mystery to me why compiler is not able to recognize that all enum cases have been considered. 🤔💭That means if the library adds a new error case in the future, your code will fail to compile until you handle it.Personally, I think Typed Throws significantly reduce the time it takes to understand what a function does without opening its implementation. Making it ideal for libraries and generally units/functions of high fan-in.
Have you ever used this in your company? If not, I’d love to hear the reasons drop a comment in the discussion section 👇
And since this is probably my last post of the year…
See you in the next article and Happy New Year 🥳
Konstantinos Nikoloutsos
]]>
SwiftUI and generally declarative UI allows us to ship screens faster than ever. But writing UI code quickly doesn’t automatically mean our app performs well.
One of the most common performance issues in SwiftUI is excessive view re-evaluation, meaning that body property get recalculated more often than needed. Well what’s the problem? This can lead to FPS decrease and make app scroll not smooth 🐢.
👉After this article you will know why some people believe that closures are evil to SwiftUI and we will take a look at some suggestion both by community and Apple itself.
When does SwiftUI re-evaluates a view?
To understand the problem, we need to clarify when SwiftUI actually re-evaluates a view. A view is re-evaluated only when one of its dependencies changes.
By dependencies we mean the properties the view’s body depends on.If none of those properties change, SwiftUI can skip that view during diffing and reuse the previous View ⚡️.
ℹ️ This is why it is considered a good approach to split your View into smaller ones. So that SwiftUI diffing can skip views that need no re-evaluated.Re-evaluation ≠ Re-render (A common mistake)
If a view is Re-rendered it has been re-evaluated. But the opposite is not true.
In SwiftUI, re-evaluation (recomputing the body) happens frequently when dependencies change and is cheap since it just creates lightweight structs.
Re-rendering (updating pixels on screen 🎨) only occurs when SwiftUI's diffing detects actual changes, but most re-evaluations produce identical views and skip rendering, which is critical because constantly re-rendering would drop FPS and make iOS apps not happy.
Thanks to and for pointing this one out.
The problem 🧐

You have:
a parent view
a ChildView
a closure passed from the parent to the child
a button that triggers a redraw
What do you think should happen when you tap the “Redraw” button?
Should ChildView be re-evaluated? Take your time ⏱️
Let’s use Self._PrintChanges() and tap the button 8 times and see what happens.

ChildView is re-evaluated every single time, even though none of its visible data changed. 😱
❗️Imagine the cost of something like that on a DashboardScreen that has many components inside.Why is this happening?
The root cause of the problem is that swift closures and equitability doesn’t go well together.
Stay to the end to see what Apple engineers recommended in their recent Q&A session.
At this point you might be thinking “How many closures have I passed to my views?“ Well you are not alone 😅
Solution:
One of the quickest solutions is to wrap the closure and provide your own Equitability. This will make SwiftUI diffing life so much easier but the developer will have to explicitly change the properties that define the equitability (the id in this case) so that the childView takes the updated closure.

So… are closures the real problem?
Short answer: not really 🤔
This isn’t something Apple can “just fix”. The real issue is what closures capture. In our example, the closure implicitly captured self because it depended on foo property .That means the closure effectively depends on the entire view value, not just one property and that explains probable the reasoning behind closures and equitability.
For the shake of this article I did some experiments and explicitly added foo in the capture list and the body was not recalculated every time ⭐️What Apple engineers said?
Q: Is there a good pattern to pass an action closure to a view while minimizing impact, given that closures are hard to compare? Is there a more performant alternative?
A: Try to capture as little as possible in closures—for example, by not relying on implicit captures (which usually capture self and therefore depend on the whole view value) and instead capturing only the properties of the view value that you actually need in the closure.
Big thanks to for writing the Q&A from Optimize Your App’s Speed and Efficiency session.
See you in the next article, till then I wish you have many productive coding sessions ⭐️
Konstantinos Nikoloutsos
]]>
With the new Swift Testing framework, Apple introduced the Confirmation API which many developers treat as interchangeable with XCTExpectation.
This is a common misconception, even myself before learning it.
Suppose that we want to test for the following code. How would you write a test?

If your first thought was to use XCTExpectation then that would work fine and the test would pass ✅.

But what would be the swift testing equivalent 🤔
The problem
Let’s try migrating the above test to Swift Testing using Confirmation.

Wait a second, why is it failing? Shouldn’t the confirmation wait until the confirmation.confirm() is called? What have we done wrong?
Nothing is wrong, it is just expected behavior from confirmation, as Apple documentation clearly states the following:

This means that confirmation is not waiting until confirmation.confirm() is called. In addition, it asserts if confirmation.confirm() was called once the closure provided exits.
⚠️ Some developers might say: “Well, userLikedVideo() should have been async so we avoid uncontrolled tasks after the function exits.”

That’s a valid point in many cases, but sometimes you want a fire and forget approach.
The solution
We basically need a way to synchronize some asynchronous code in the testing. That sounds something that withCheckedContinuation could do. Let’s see it in action 🏁

(1) We await until withCheckedContinuation is resumed/finished.
(2) When the asynchronous operation finish we call resume() to proceed to assertion/expectation phase.
(3) We do an action that we want to unit test.
(4) We do the assertion and it is guaranteed that the asynchronous code has finished 🎉
Bonus points 🎰
Let’s say we ship this code. Months later, a developer reports that tests are taking too long ⏰.
Why? 🤦♂️
Because we assumed step (2), the call to resume(), would always happen. If production code changes and stops calling trackVideoLiked() then the test will hang until the timeout is reached.
And here’s the tricky part:
You might think, “I’ll just set the Swift test limit trait to 2 seconds.”
Unfortunately, that’s not possible as the minimum timeout per test is 1 minute. You can read more about this in the documentation.

So what are we doing now? We give up? One solution that I’ve seen on the community is this by Alejandro Ramirez which allows defining a maxtime to wait.
My personal recommendation is first try to refactor your code not to have uncontrolled asynchronous code just like we had in this article with the Task being created inside the function. And if there is nothing else you can do feel free to use the withCheckedContinuation as an alternative.
❗️Sometimes it’s not a bad idea to stick with XCTest if something is hard to test with Swift Testing. Having stable and reliable tests can be more valuable than always using the latest technology.If you’ve encountered something similar, I’d love to hear your thoughts in the comments.
See you in the next article! 👋💪
Konstantinos Nikoloutsos
This is Konstantinos’s Substack.
]]>