It's a typical day in Lagos, and word has gotten out that there might be fuel scarcity coming up. Within hours, a long line of cars forms at every filling station. Some drivers doze off in their cars, others stand in groups discussing the state of the nation, but everyone follows one simple rule - newcomers join at the back of the line.
Welcome to a perfect real-world example of a Queue data structure!
What is a Queue?
A Queue is a data structure that follows the First-In-First-Out (FIFO) principle. Like that fuel station line where Oga John (waiting since 4 AM) must be served first, the first element added to the queue will be the first one removed.
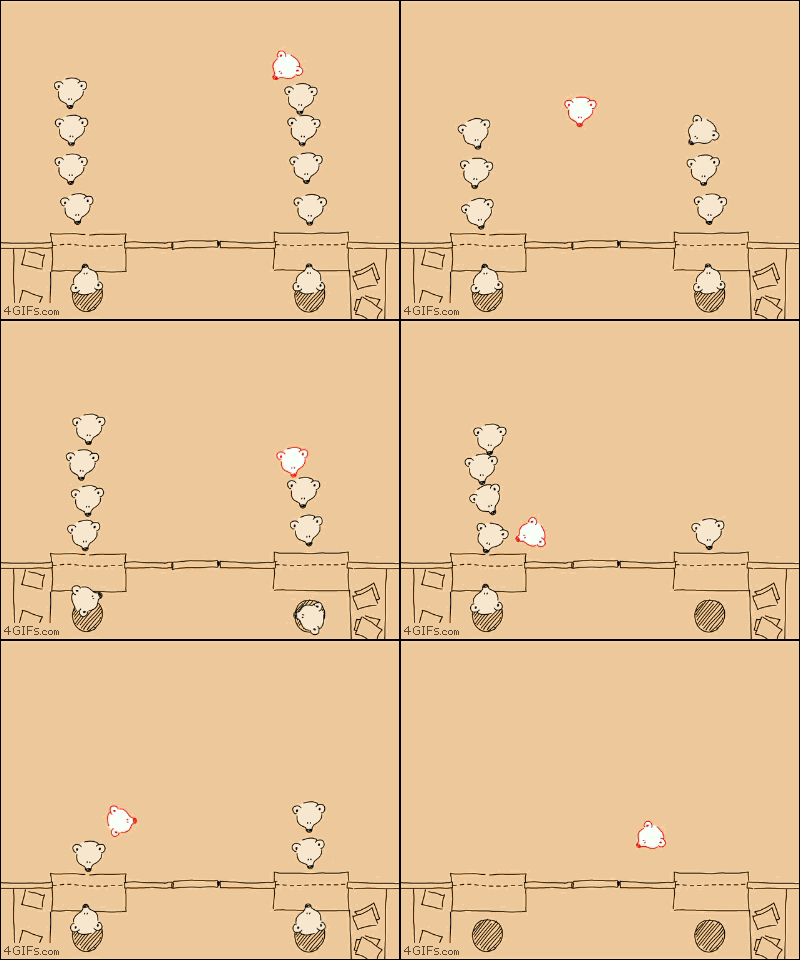
Let's implement a basic Queue in Go:
// Queue represents a thread-safe FIFO queue structure
type Queue struct {
    items []interface{}
    mu    sync.Mutex    // For thread safety
}

// NewQueue creates and returns a new empty queue
func NewQueue() *Queue {
    return &Queue{
        items: make([]interface{}, 0),
    }
}

// Enqueue adds an item to the back of the queue
// Time Complexity: O(1)
func (q *Queue) Enqueue(item interface{}) {
    q.mu.Lock()
    defer q.mu.Unlock()
    q.items = append(q.items, item)
}

// Dequeue removes and returns the front item
// Time Complexity: O(n) with slices, O(1) with linked lists
func (q *Queue) Dequeue() (interface{}, error) {
    q.mu.Lock()
    defer q.mu.Unlock()

    if len(q.items) == 0 {
        return nil, errors.New("queue is empty")
    }
    item := q.items[0]
    q.items = q.items[1:]
    return item, nil
}

// Peek returns the front item without removing it
func (q *Queue) Peek() (interface{}, error) {
    q.mu.Lock()
    defer q.mu.Unlock()

    if len(q.items) == 0 {
        return nil, errors.New("queue is empty")
    }
    return q.items[0], nil
}

// IsEmpty checks if the queue has no items
func (q *Queue) IsEmpty() bool {
    return len(q.items) == 0
}

// Size returns the number of items in the queue
func (q *Queue) Size() int {
    return len(q.items)
}
Queue Variations
1. Circular Queue
Perfect for fuel stations! When a car leaves the front, the space can be reused:
type CircularQueue struct {
    items    []interface{}
    front    int
    rear     int
    size     int
    capacity int
}
2. Priority Queue
For emergency vehicles or VIP customers:
type PriorityQueue struct {
    items []*PQItem
}

type PQItem struct {
    value    interface{}
    priority int
}
Real-World Applications
1. Print Job Scheduling
When the office printer is handling multiple print jobs, it's just like cars lining up at a fuel pump - first come, first served!
type PrintJob struct {
    documentName string
    pages       int
}

func demonstratePrinterQueue() error {
    printerQueue := NewQueue()

    // Add print jobs
    printerQueue.Enqueue(PrintJob{"Quarterly_Report.pdf", 50})
    printerQueue.Enqueue(PrintJob{"Team_Photo.jpg", 1})

    // Process jobs with error handling
    for !printerQueue.IsEmpty() {
        job, err := printerQueue.Dequeue()
        if err != nil {
            return fmt.Errorf("printer queue error: %v", err)
        }
        printJob := job.(PrintJob)
        fmt.Printf("Printing: %s (%d pages)\n",
            printJob.documentName, printJob.pages)
    }
    return nil
}
2. Modern Fuel Station Management
Let's simulate how a modern fuel station might handle its queue of vehicles:
type VehicleRequest struct {
    plateNumber    string
    fuelType       string
    litersNeeded   float64
    arrivalTime    time.Time
}

type QueueStats struct {
    averageWaitTime time.Duration
    totalServed     int
}

func demonstrateFuelQueue() (*QueueStats, error) {
    fuelQueue := NewQueue()
    stats := &QueueStats{}

    // Process vehicles with wait time tracking
    for !fuelQueue.IsEmpty() {
        vehicle, err := fuelQueue.Dequeue()
        if err != nil {
            return nil, err
        }
        request := vehicle.(VehicleRequest)
        waitTime := time.Since(request.arrivalTime)
        stats.averageWaitTime += waitTime
        stats.totalServed++

        fmt.Printf("Serving: %s - Wait time: %v\n",
            request.plateNumber, waitTime)
    }

    if stats.totalServed > 0 {
        stats.averageWaitTime /= time.Duration(stats.totalServed)
    }
    return stats, nil
}
3. Message Buffering in Communication Systems
Just like how vehicles in a fuel queue move forward one at a time, message queues ensure orderly processing of data in communication systems:
type Message struct {
    sender    string
    content   string
    timestamp time.Time
}

func demonstrateMessageBuffer() {
    messageQueue := NewQueue()

    // Messages arriving
    messageQueue.Enqueue(Message{
        sender:    "System Alert",
        content:   "Low fuel warning at Pump 3",
        timestamp: time.Now(),
    })
    messageQueue.Enqueue(Message{
        sender:    "Payment Gateway",
        content:   "Transaction successful for LAG-123-XY",
        timestamp: time.Now(),
    })

    // Processing messages in order
    fmt.Println("Processing system messages...")
    for !messageQueue.IsEmpty() {
        msg, _ := messageQueue.Dequeue()
        message := msg.(Message)
        fmt.Printf("From %s: %s\n", message.sender, message.content)
    }
}
Common Pitfalls
Memory Leaks: Not properly removing references to dequeued items
Race Conditions: Forgetting thread safety in concurrent operations
Overflow/Underflow: Not checking queue bounds
Performance Issues: Using slices instead of linked lists for large queues
Limitations
Fixed-Size Queues: Must handle overflow scenarios
Memory Usage: Linear space complexity
Performance: Dequeue operations with slices are O(n)
Conclusion
Queues bring order to chaos, whether in computing or at fuel stations. They come in various forms (circular, priority, double-ended) and can be implemented using different underlying structures (arrays, linked lists) depending on your needs.
Remember: Like a well-managed fuel queue prevents chaos at the station, a well-implemented queue prevents chaos in your system!
Pro Tip: Next time you're in a queue, ponder whether it's implemented as a circular queue or if it needs priority queue features for those emergency vehicles! (But maybe keep the data structure jokes to yourself - the person behind you might not appreciate your technical humor under the hot Lagos sun).
]]>Ever wondered how your Spotify playlist manages to smoothly skip from your favorite workout anthem to your driving song? Or how your browser lets you time-travel through your rabbit-hole ridden late-night browsing history? Welcome aboard the Linked List Express, where we'll explore one of computer science's most fundamental data structures through the lens of something we all understand: trains!
The Train Analogy: More Than Just a Clever Connection
Picture this: you're standing at a train station (let's call it Memory Station), watching a cargo train roll by. Each train car carries its precious cargo (data), and each car is connected to the next one by a coupling mechanism (pointers). The engine at the front? That's our head pointer, the starting point of our linked list.
// Node represents a single car in our Linked List Express
type Node struct {
    // The data this car is carrying
    data interface{}
    // A pointer to the next car (node) in the train
    next *Node
}

// LinkedList is our entire train
type LinkedList struct {
    head *Node // The engine that starts our journey
    length int
}
Just like how you can't jump magically from the first car to the last (unless you're Tom Cruise on a mission to pull an impossible stunt😉), in a linked list, you need to traverse through each node to reach your destination. Each node knows only about itself and who's next in line - talk about living in the moment!
Real-World Applications: Where the Rubber Meets the Rails
Let's see some real-world use cases/scenarios where linked list might be used in their implementation.
1. The Ultimate Playlist Manager 🎵
Remember that awesome playlist you created? Here's how a linked list might make it work:
type Song struct {
    title string
    artist string
    next *Song
}

func (playlist *LinkedList) addSong(title, artist string) {
    newSong := &Song{
        title: title,
        artist: artist,
    }

    if playlist.head == nil {
        playlist.head = newSong
        return
    }

    current := playlist.head
    for current.next != nil {
        current = current.next
    }
    current.next = newSong
}
Want to skip that embarrassing old song? No problem! Just reconnect the previous song to the next one, and poof! It's gone.
2. Browser History: Time Travel Made Easy 🕰️
Your browser history is essentially a linked list of web pages. Each page points to the previous one, allowing you to hit that back button when you accidentally end up on that weird video on YouTube at 3 AM.
3. The Magical Undo Button ↩️
Ever wondered how your text editor remembers all those changes you made? Each edit operation is stored as a node in a linked list, making it possible to undo your way back to when your code actually worked.
type TextEdit struct {
    operation string
    content string
    position int
    next *TextEdit
}
The Good, The Bad, and The Linked
Advantages:
Dynamic size (unlike arrays, our train can be as long as we need)
Easy insertion and deletion (just couple or uncouple the cars)
Efficient memory usage (no need to reserve a whole train yard)
Disadvantages:
No random access (can't teleport to the middle car)
Extra memory for pointers (those coupling mechanisms aren't free!)
Sequential access can be slower than arrays (walking through train cars takes time)
Conclusion: End of the Line
Linked lists might seem simple, but like a well-run railway system, they're the backbone of many complex operations in computer science. Whether you're managing a playlist, browsing the web, or hitting Ctrl+Z for the hundredth time, linked lists are quietly doing their job, connecting one piece of data to the next.
Remember: In the world of data structures, sometimes the simplest solutions are the most elegant. Just like how a train doesn't need to be fancy to get the job done, linked lists prove that sometimes, all you need is a good connection.
Next stop: Stacks! (But that's a story for another article)
]]>This is an example of how I use AI to fill my learning gaps and gain intuitive understanding of concepts. In this example, I asked Claude AI to help me understand Interfaces in Go.
If you find this concept fuzzy like I did (likely due to not having a traditional OOP background), you will want to read this.
Prompt:
Let’s dive in!
Think of an interface as a contract or a job description. It doesn't do the work itself; it just describes what work needs to be done.
Real-world analogy: Restaurant Kitchen
Imagine you're running a restaurant kitchen. You have a position called "Chef" (this is your interface). The Chef position requires that whoever fills it must be able to do certain things:
Cook meals
Create menus
Manage kitchen staff
Now, you don't care who specifically fills this role, as long as they can do these things. This is exactly what an interface does in Go: it defines a set of methods that a type must have without specifying how those methods are implemented.
type Chef interface {
    CookMeal(dish string) string
    CreateMenu() []string
    ManageStaff()
}
Structs and Interfaces
In our analogy, specific chefs (like a French Chef or a Sushi Chef) are like structs in Go. They are concrete types that can implement the Chef interface.
type FrenchChef struct {
    Name string
    Speciality string
}

func (f FrenchChef) CookMeal(dish string) string {
    return "Cooked " + dish + " with French techniques"
}

func (f FrenchChef) CreateMenu() []string {
    return []string{"Coq au Vin", "Ratatouille", "Crème Brûlée"}
}

func (f FrenchChef) ManageStaff() {
    // Implementation details
}
Here, FrenchChef is a struct that implements all the methods required by the Chef interface. In Go, this implementation is implicit; we don't need to explicitly state that FrenchChef implements Chef.
Methods and Interfaces
Methods in Go are functions associated with a particular type. In our analogy, these are the specific ways a chef performs their duties. The interface defines what methods must exist, while the struct provides the actual implementation.
Functions and Interfaces
Functions can accept interfaces as parameters, which is where the real power of interfaces comes in. It allows for polymorphism—the ability to use different types in the same way.
func PrepareSpecialMeal(c Chef) {
    menu := c.CreateMenu()
    c.CookMeal(menu[0])
    c.ManageStaff()
}
This function can work with any type that implements the Chef interface, be it a FrenchChef, SushiChef, or any other type of chef.
Instances and Interfaces
An instance is a concrete realization of a struct. In our analogy, it's like hiring a specific person to be your French Chef.
pierreTheFrenchChef := FrenchChef{Name: "Pierre", Speciality: "Pastries"}
Now, pierreTheFrenchChef is an instance of FrenchChef, and because FrenchChef implements all methods of the Chef interface, we can use pierreTheFrenchChef anywhere a Chef is expected.
PrepareSpecialMeal(pierreTheFrenchChef)
The Power of Interfaces
Flexibility: You can easily swap implementations. If you decide you want Italian cuisine instead of French, you just need to create an
ItalianChefstruct that implements theChefinterface.Testing: Interfaces make it easy to create mock implementations for testing.
Decoupling: Your code depends on interfaces (abstractions) rather than concrete implementations, making it more modular and easier to change.
Real-world Example: Database Access
Interfaces are commonly used for database access in Go applications:
type DataStore interface {
    Save(data []byte) error
    Load(id string) ([]byte, error)
}

type FileStore struct {
    // implementation details
}

type DatabaseStore struct {
    // implementation details
}
Both FileStore and DatabaseStore can implement the DataStore interface. This allows you to write code that works with data storage without caring about whether it's being stored in files or a database.
In conclusion, interfaces in Go provide a powerful way to define behavior, enable polymorphism, and create more flexible and testable code. They work hand-in-hand with structs (which provide the concrete implementations), methods (which define the behavior), and functions (which can work with any type that satisfies an interface).
]]>The Certified Kubernetes Administrator (CKA) certification is a globally recognized and highly sought-after credential for professionals working with Kubernetes, the leading open-source container orchestration platform. Kubernetes has become an essential tool for organizations seeking to streamline their application deployment, scaling, and management processes, enabling efficient and reliable operations in modern cloud-native environments.
Prerequisites and Background
Before embarking on my journey to obtain the Certified Kubernetes Administrator (CKA) certification, I had already accumulated a solid foundation in linux administration, and containerization and orchestration technologies. My exposure to Docker, the industry-leading containerization technology, provided me with a strong understanding of the principles and benefits of containerizing applications.
In addition to my Docker experience, I had also gained familiarity with cloud platforms and their container orchestration services. Working with services like AWS Elastic Kubernetes Service (EKS), and Elastic Container Service (ECS) introduced me to the concept of managed Kubernetes clusters and the benefits they offer in terms of simplified deployment and maintenance.
It's worth mentioning that prior to embarking on my CKA journey, I had already prepared myself for the Kubernetes and Cloud Native Associate (KCNA) certification. This provided me with a solid foundation in Kubernetes concepts, including pods, deployments, services, and storage management.
From April 1 to July 9, 2023, I participated in a #100DaysOfKubernetes challenge organized by my friend, mentor and co-organizer of CNCF Lagos Chapter, CNCF Ambassador Ileriayo Adebiyi. This challenge was my baptism into the world of Kubernetes. Everyday, for 100 days we learnt something new about Kubernetes as a community. We went throught the book Kubernetes: Up and Running by Kelsey Hightower, Brendan Burns, Joe Beda, and Lachlan Evenson.
Study Resources
To prepare for the Certified Kubernetes Administrator (CKA) exam, I leveraged a combination of selected study resources, each offering a unique perspective and approach to mastering Kubernetes administration.
KodeKloud's Certified Kubernetes Administrator Course
The primary resource I relied on was KodeKloud's Certified Kubernetes Administrator Course. This comprehensive course provided a structured learning path, covering all the essential topics required for the CKA exam according to the exam curriculum.
What truly set this course apart was the inclusion of hands-on practice labs and mock exams. These interactive labs allowed me to gain practical experience in configuring, deploying, and managing Kubernetes clusters in a simulated environment. The mock exams were particularly valuable, as they closely mimicked the format and difficulty level of the actual CKA exam, helping me identify areas where I needed further practice and reinforcement.
KodeKloud's Ultimate CKA Mock Exams Course
I also took the Ultimate CKA Mock Exams course on the KodeKloud platform. This resource features 13 comprehensive mock exams that closely resemble the format and difficulty level of the actual CKA exam. These mock exams proved invaluable in testing my knowledge and identifying any gaps or areas where I needed further improvement.
The mock exams challenge my problem-solving skills and ability to apply Kubernetes concepts in real-world scenarios. They covered all the necessary topics, including cluster architecture, installation and configuration, workload management, networking, storage, security, and troubleshooting.
After each mock exam session, I received detailed feedback and explanations, which helped me understand the rationale behind the correct answers and learn from my mistakes. This iterative process of taking mock exams, reviewing feedback, and reinforcing my knowledge proved to be an effective strategy in preparing for the CKA exam.
James Spurin's "DiveInto Kubernetes and Cloud-Native" Course
While the KodeKloud courses provided a comprehensive overview of Kubernetes administration, worth mentioning is James Spurin's "DiveInto Kubernetes and Cloud-Native" course. This course, which I had taken months prior, provided a solid foundation in the fundamental concepts of Kubernetes and Cloud-Native technologies.
This course gave me an in-depth understanding of Kubernetes architecture, container runtime, networking, and storage components. It provided a strong theoretical grounding, which complemented the practical aspects covered in the other resources. Spurin's clear and concise explanations, coupled with real-world examples, helped me develop a deeper understanding of the underlying principles driving Kubernetes.
Equally important was the downloadable hands-on labs environment that was included in the course. This is now a highly valuable tool in my toolbox, as I use it at any point I need to test out something an need to quickly spin up a local multi-node Kubernetes environment.
Killer Shell's CKA Exam Simulator
As the exam date approached, I recognized the importance of practicing in an environment that closely mimicked the actual CKA exam setup. This is where Killer Shell's CKA Exam Simulator became an invaluable resource. When you purchase the CKA exam voucher, you also get two vouchers for Killer Shell. When you activate a session on Killer Shell, it lasts for 36 hours, giving you ample time to practice and learn from your mistakes as detailed solutions to each question is provided after the simulation.
The simulator provided a realistic and timed exam environment, complete with a Kubernetes cluster and a set of challenging questions and tasks. It allowed me to experience the pressure of working within a time constraint, managing multiple terminals, and navigating through various Kubernetes components and configurations.
The simulator's questions were diverse and covered a wide range of topics, testing my ability to apply my knowledge in practical scenarios. Additionally, the detailed explanations and solutions provided after each question helped me reinforce my understanding and learn from any mistakes or oversights.
By combining these study resources, I was able to approach the CKA exam with confidence, having gained a well-rounded perspective on Kubernetes administration. The hands-on practice, mock exams, and theoretical foundations provided by these resources were instrumental in my successful preparation for the challenging CKA certification.
Study Plan, Strategies, and Exam Preparation
As the exam date approached, my focus shifted toward intensive practice and fine-tuning my skills to perform optimally on the big day. To begin with, I created a detailed timetable that allocated specific days and times for learning and practicing different topics covered in the CKA curriculum. This structured approach helped me maintain a steady pace and ensured that I covered all the essential areas without overlooking any critical concepts.
Each day, I dedicated time to studying theoretical concepts using the various resources at my disposal, such as video lectures, online documentation, and study guides. After solidifying the theoretical foundations, I immediately applied the knowledge through hands-on practice labs and exercises. This combination of theory and practice not only reinforced my understanding but also helped me develop muscle memory for executing Kubernetes commands and configurations.
Throughout my study journey, I maintained a comprehensive note in my Obsidian Notetaking App where I documented important concepts, commands, and best practices. This notes app served as a valuable reference material, particularly for commands I didn't want to forget, allowing me to quickly revisit key points during my revision sessions.
The mock exams provided by resources like KodeKloud's Ultimate CKA Mock Exams course and Killer Shell's CKA Exam Simulator were instrumental in this final preparation phase. These simulated exams closely mimicked the actual CKA exam environment, allowing me to experience the pressure of working within time constraints.
As the exam date drew closer, I shifted my focus towards intense practice and simulation. In the four days leading up to the exam, I immersed myself in an intensive mock exam marathon. During this period, I completed two to three full-length mock exams each day, simulating the exam conditions as closely as possible. After each mock exam, I meticulously reviewed my performance, identified areas of weakness, and reinforced my knowledge by revisiting relevant study materials and practicing targeted exercises. Oh, and yes, I did take time off work to focus solely on preparing for the CKA.
Recommendations & Conclusion
The journey to becoming a Certified Kubernetes Administrator (CKA) was a challenging yet immensely rewarding experience. As I reflect on this accomplishment, I feel grateful for the lessons learned and the growth I've experienced. Looking back, there are several pieces of advice and recommendations I would like to share with aspiring CKA candidates.
First and foremost, it is crucial to have a solid foundation in Containerization and Orchestration Concepts, Linux Administration, Command Line, and Networking. While Kubernetes is the focus of the CKA exam, understanding these underlying principles will provide a strong base for grasping Kubernetes architecture and operations. I highly recommend investing time in understanding these fundamentals before delving into Kubernetes-specific topics.
Secondly, hands-on practice is paramount. Kubernetes is a complex system, and merely reading or watching videos will not be sufficient to master its intricacies. Engage in as many hands-on labs and exercises as possible, recreating real-world scenarios and configurations. This practical experience will not only reinforce your understanding but also build the muscle memory required to navigate through the exam efficiently. Remember, speed and accuracy are both essential in the exam environment.
Additionally, I cannot overemphasize the importance of utilizing high-quality study resources. The resources I mentioned earlier, such as KodeKloud's courses and CKA Mock Exams, James Spurin's "DiveInto Kubernetes and Cloud-Native" course, and Killer Shell's CKA Exam Simulator, were invaluable in my preparation. Invest in reputable and comprehensive resources that provide a well-rounded learning experience, covering both theoretical and practical aspects.
Finally, embrace the journey and celebrate your accomplishments along the way. The path to becoming a CKA is not an easy one, and there will be moments of frustration and self-doubt. However, staying motivated, seeking support from the Kubernetes community, and acknowledging your progress will help you overcome these challenges and emerge victorious.
]]>Introduction
Frankly, I don't use N8N often enough to justify paying $20 monthly for a subscription. However, I use it enough to set up the self-hosted community version more times than would be considered a productive use of my time if I continued doing it manually (i.e., ClickOps).
So, I did what any cloud-native professional would do. I automated the process. Now, with a simple terraform apply -auto-approve I can have N8N up and running in less than 3 minutes, and with a terraform destroy -auto-approve I can tear it all down and clear from my cloud account.
That is:
The virtual machine provisioning and configuration
The server installation and configuration
The automation software installation and configuration.
All of it! Well, most of it. You still have to configure your DNS records manually to point to the N8N server.
This article will guide you through a step-by-step process to achieve the same result. Ready!
Psst! If going through a guide like this is not your thing and you would rather just get the code and hack your way through it, that's cool too. Here's the GitHub repo.
Alrighty! Let's begin.
...But first, what is N8N?
N8N is a powerful Zapier alternative. Whilst Zapier can be expensive to make any meaningful use of the tool, N8N allows you to self-host the software on your servers. However, setting up N8N manually can be a time-consuming endeavor, especially for those who find themselves repeating the process frequently.
The N8N.io website states: "n8n allows you to build flexible workflows focused on deep data integration. And with sharable templates and a user-friendly UI, the less technical people on your team can collaborate on them too. Unlike other tools, complexity is not a limitation. So you can build whatever you want — without stressing over budget."
Prereqs: What you'll need
You'll need a white he-goat, a red... Just kidding.
You'll need an account with a Cloud Service Provider (CSP). Here, I'm using DigitalOcean. Get $200 in credit on DigitalOcean by using this link to sign up.
You need a Linux/Unix environment to run the commands mentioned in this guide. You can use WSL or a virtual machine if you're on Windows.
We will be using Terraform for automating infrastructure provisioning. Install Terraform. I use tfenv to install and manage Terraform versions.
We will use Ansible to configure the machine, and install, and configure the Caddy Server and the N8N software. For a guide on how to Install Ansible on your local machine, click here
It is also helpful to install the VSCode extensions for Terraform and Ansible (if you use VSCode).
The only manual activities include configuring the sub-domain with your DNS provider and entering the required variable values.
Step 00: Get API Token
We need a way to create, edit, and delete resources on your cloud service account programmatically without manually logging in to your account. That's what APIs help do and getting an API token from your account with the right amount of permissions allows us to use Terraform or other tools to manipulate the account as needed.
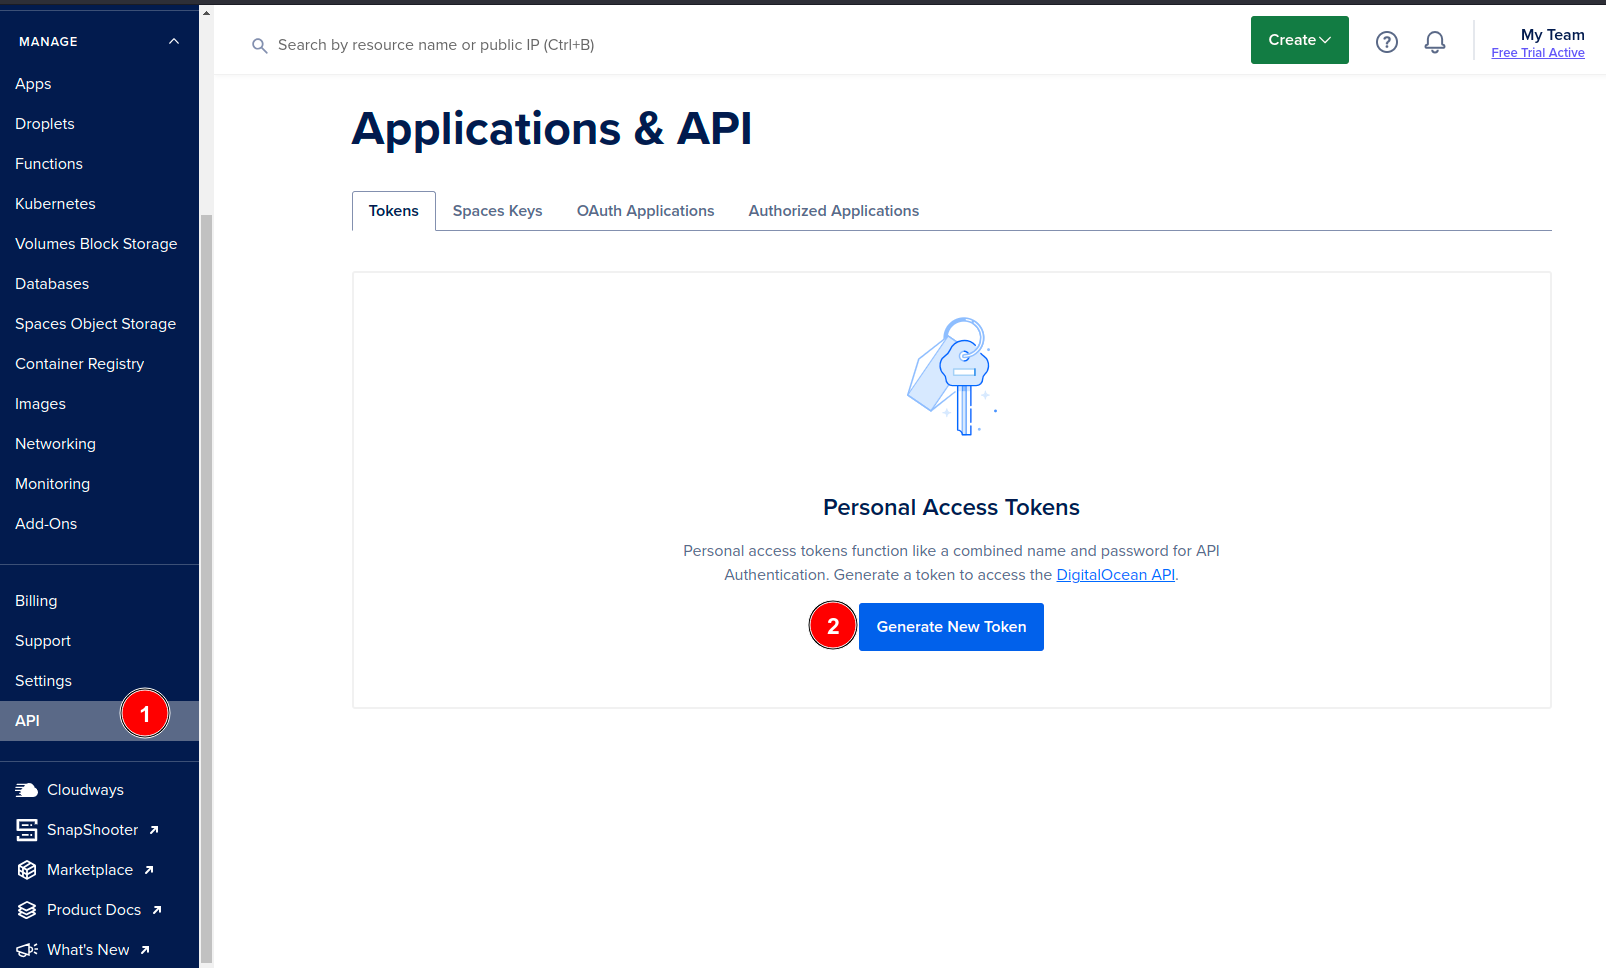
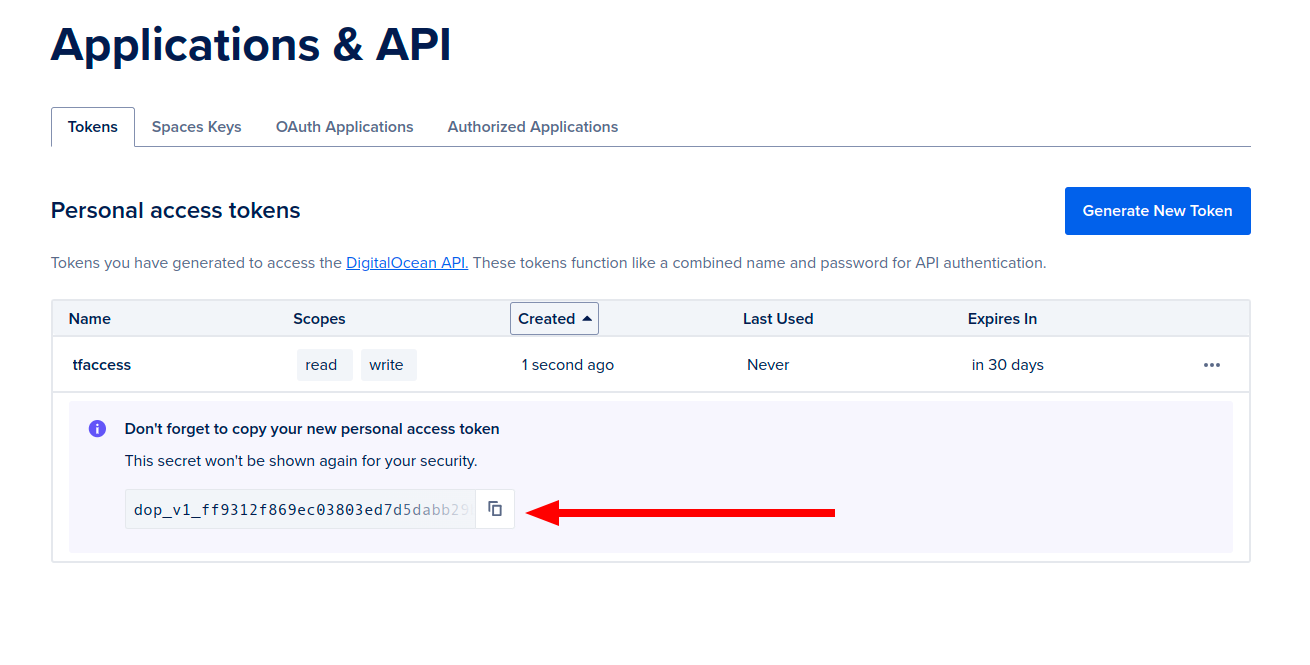
Get an API token from your cloud service account dashboard. In DigitalOcean, API -> Tokens -> Generate New Token
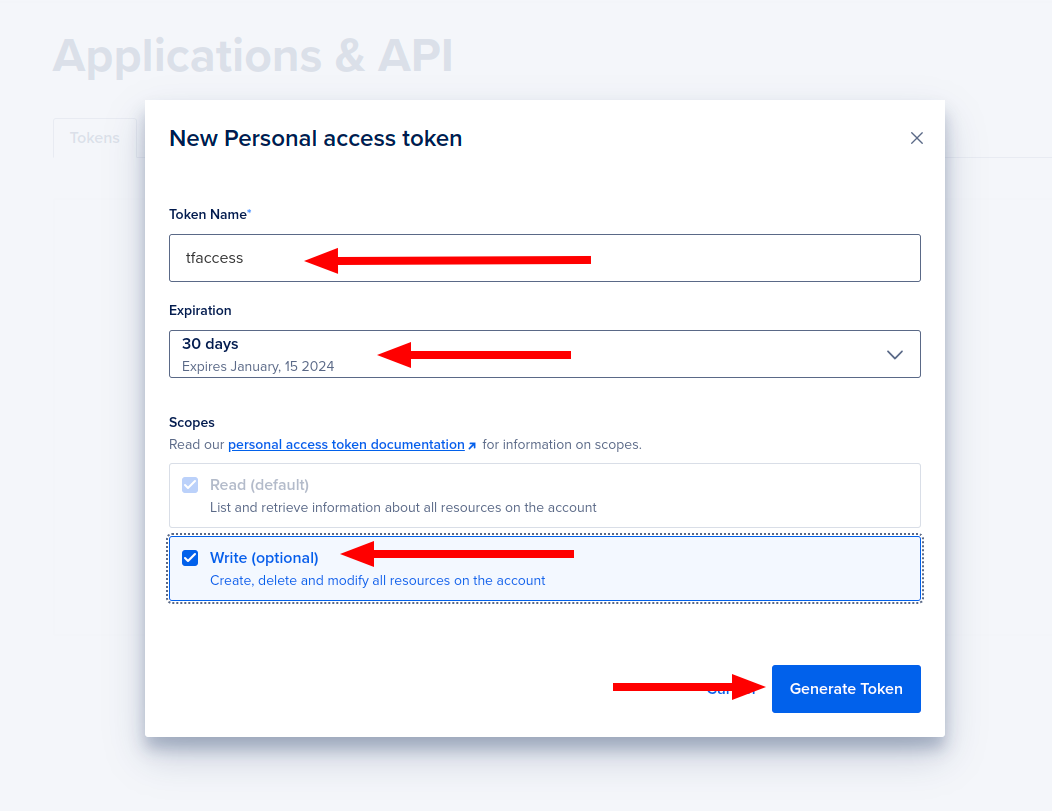
Enter the name of the new token you're creating, select an expiration duration for the token, and select the Write option under Scopes. Click on Generate Token
Copy out the generated token and save it somewhere safe and accessible to you. This will be your only chance to access this token on the dashboard. If you lose it, you'll have to generate a new one.
Step 01: Define Infrastructure with Terraform
Create your project folder. I have named mine auto-n8n-setup. The final directory structure looks like this:
./
├── main.tf # Define terraform resources here
├── playbook.yml # Ansible playbook
├── providers.tf # Define all terraform providers to be used
├── terraform.tfvars # Values for your defined variables. NEVER PUSH TO GIT!
├── variables.tf # Define variables here
└── vars.yml # Define variables for Ansible playbook here
First, set up the providers in providers.tf. This tells Terraform what plugins to install when you run terraform init. In this guide, we only need the DigitalOcean provider.
terraform {
    required_providers {
        digitalocean = {
            source = "digitalocean/digitalocean"
            version = "~>2.0"
        }
    }
}

provider "digitalocean" {
    token = var.do_token
}
Here, we use var.do_token which has been defined in variables.tf to hold the API token created earlier.
We will begin to define the resources we need. We need a droplet (virtual machine), and a way to connect to that droplet. In main.tf, enter the following code:
resource "digitalocean_ssh_key" "mysshkey" {
    name = "My SSH Key"
    public_key = file(var.ssh_public_key_path)
}

resource "digitalocean_droplet" "autoserver" {
    name = "auto-server"
    region = "lon1"
    size = "s-1vcpu-2gb-amd"
    image = "ubuntu-20-04-x64"
    ssh_keys = [digitalocean_ssh_key.mysshkey.fingerprint]
}
Above, we have created an SSH Key resource in the DigitalOcean account called mysshkey. We have passed a variable that should hold the path to the public key file. The variable ssh_public_key_path should be defined in variables.tf file.
We have also created a droplet resource called autoserver. The region argument specifies the region where the droplet should be located. The size specifies the exact droplet SKU to be used. Find the available SKUs on the DigitalOcean pricing page. The image specifies the prepacked OS, Kernel, & software to use to provision the droplet. The ssh_keys argument specifies the public key to be added to the droplet to allow for SSH access. In this case, we are making use of the mysshkey resource.
Next, we will define the variables in the variables.tf file.
variable "do_token" {}
variable "ssh_private_key_path" {}
variable "ssh_public_key_path" {}
Create terraform.tfvars to define the values for the variables. Remember to never commit this file to git.
do_token="paste your API token here"

ssh_public_key_path="/path/to/public_key.pub"

ssh_private_key_path="/path/to/private_key"
At this point, you can run terraform init, terraform plan, and terraform apply to test your work so far to ensure you can indeed connect to your account and create resources.
Step 02: Configure Server with Ansible
We will use Ansible to automate configuring the virtual machine, installing dependencies, installing and configuring Docker & Docker-Compose, Caddy server and reverse proxy, the N8N Workflow Automation Software, and starting the Docker containers. In playbook.yml enter the following code:
---
- name: Install and configure n8n with Docker and Caddy
  hosts: all
  remote_user: root
  vars_files:
    - vars.yml
  gather_facts: true

  tasks:
    - name: Create new non-root user
      user:
        name: "{{user}}"
        group: sudo

    - name: Stop request for passwords from user's sudo commands
      copy:
        content: "{{user}} ALL=(ALL) NOPASSWD:ALL"
        dest: "/etc/sudoers.d/{{user}}"
        mode: '0440'

    - name: Add SSH Key to new user
      authorized_key:
        user: "{{user}}"
        state: present
        key: "{{ lookup('file', pub_key) }}"

    - name: Install dependencies
      package:
        name: "{{ item }}"
        state: present
      loop:
        - git
        - curl

    - name: Install Docker and Docker Compose
      block:
        - name: Install Docker on Debian-based systems
          apt:
            name: docker.io
            state: present
          when: ansible_os_family == 'Debian'

        - name: Install Docker on RHEL-based systems
          yum:
            name: docker
            state: present
          when: ansible_os_family == 'RedHat'

        - name: Install Docker Compose
          get_url:
            url: "https://github.com/docker/compose/releases/latest/download/docker-compose-{{ ansible_system | lower }}-{{ ansible_machine }}"
            dest: /usr/local/bin/docker-compose
            mode: 'ugo+x'
          async: 1200
          poll: 0

      when: ansible_os_family == 'Debian' or ansible_os_family == 'RedHat'

    - name: Clone n8n repository
      git:
        repo: https://github.com/n8n-io/n8n-docker-caddy.git
        dest: /home/{{user}}/n8n-docker-caddy
        version: main

    - name: Set ownership of the cloned files
      file:
        path: /home/{{user}}/n8n-docker-caddy
        owner: "{{user}}"
        recurse: yes

    - name: Add user to the Docker group
      user:
        name: "{{user}}"
        groups: docker
        append: yes

    - name: Create Docker volumes
      docker_volume:
        name: "{{ item }}"
      loop:
        - caddy_data
        - n8n_data

    - name: Allow traffic on ports 80 and 443
      ufw:
        rule: allow
        port: "{{ item }}"
        proto: tcp
      loop:
        - 80
        - 443

    - name: Update .env file
      replace:
        path: /home/{{user}}/n8n-docker-caddy/.env
        regexp: "{{ item.regexp }}"
        replace: "{{ item.replace }}"
      loop:
        - { regexp: 'DATA_FOLDER=/<directory-path>', replace: 'DATA_FOLDER=/home/{{user}}' }
        - { regexp: 'DOMAIN_NAME=example.com', replace: 'DOMAIN_NAME={{domain}}.{{domain_suffix}}' }
        - { regexp: 'GENERIC_TIMEZONE=Europe/Berlin', replace: 'GENERIC_TIMEZONE={{timezone}}' }

    - name: Update Caddyfile
      replace:
        path: /home/{{user}}/n8n-docker-caddy/caddy_config/Caddyfile
        regexp: 'n8n.<domain>.<suffix>'
        replace: 'n8n.{{domain}}.{{domain_suffix}}'

    - name: Set ownership for n8n directory
      file:
        path: /home/{{user}}/n8n-docker-caddy
        owner: "{{user}}"
        recurse: yes

    - name: Bring up Docker containers
      command: docker-compose up -d
      args:
        chdir: /home/{{user}}/n8n-docker-caddy
The Ansible YAML code above is quite self-explanatory, but a few key things to note are:
- Create a file called
vars.ymlto hold your variables to be used in the Ansible Playbook
---
user: youruser # the name of the user to be created and used in the Ansible playbook
subdomain: subdomain_name
domain: domain_name # your domain name
domain_suffix: com

# subdomain, domain, and domain_suffix combined decide where n8n
# will be reachable from above example would result in:
# https://n8n.example.com

timezone: your_time_zone # In the format Africa/Lagos
- In the
Add SSH Key to new usertask, we are passing a variable to the path for a file. This variable will be defined later when using Terraform to initiate Ansible.
Step 03: Run Ansible from Terraform
To run Ansible from Terraform, we will need to add provisioners to our Terraform code. One provisioner to first execute code remotely on the newly provisioned server to first ensure all that Ansible requires to successfully run is installed. The second provisioner will execute on the local machine which will run the Ansible playbook with the newly provisioned server as the target.
Within the autoserver resource above, add the following code for the two provisioners.
...

provisioner "remote-exec" {
    inline = ["sudo apt update", "sudo apt install python3 -y", "echo Server Ready!"]

    connection {
        host = self.ipv4_address
        type = "ssh"
        user = "root"
        private_key = file(var.ssh_private_key_path)
    }
}

provisioner "local-exec" {
    command = "ANSIBLE_HOST_KEY_CHECKING=False ansible-playbook -u root -i ${digitalocean_droplet.autoserver.ipv4_address}, --private-key=${var.ssh_private_key_path} -e 'pub_key=${var.ssh_public_key_path}' playbook.yml"
}

...
remote-execconnects to the server and executes the inline commands on the server.local-execexecutes the command on our local development machine.
Step 04: Configure DNS and Access N8N via your Browser
The Ansible playbook configures the Caddy server with the sub-domain you have set. Allowing you to visit the subdomain in your browser to use N8N. However, at this point, this would not work. To make it work, we need the IP address of the newly created server.
Get Terraform to print out the IP Address in the console by adding an output block to the main.tffile:
output "droplet_ip" {
    value = digitalocean_droplet.autoserver.ipv4_address
}
Run terraform init, terraform plan, and terraform apply and watch your Terraform and Ansible configuration run.
Copy the IP Address printed out when terraform is done executing.
Go to your DNS service provider and add an
Arecord pointing to the IP Address you copied. NOTE: You might have to wait a while for the subdomain to propagate.
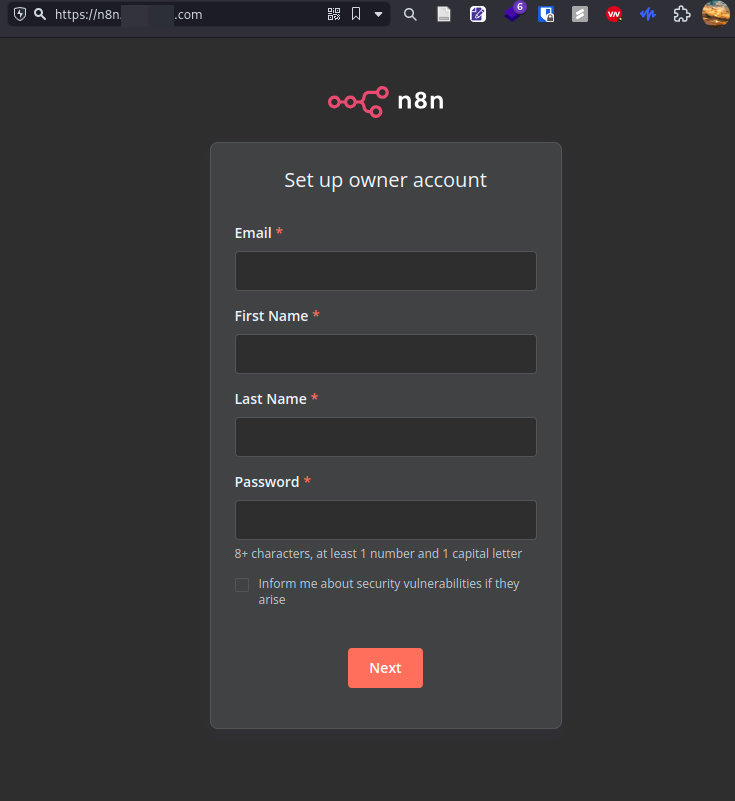
When your DNS is configured and your subdomain has propagated, you can visit it in your browser to begin using N8N.
Step 05: Tearing it all down!
Now, to one of my favorite parts of Terraform, tearing it all down. With one line of code, we can bring down everything we built when we no longer need the infrastructure running. This way we can save on cloud costs and avoid being the real-world subject of that meme of the homeless person who forgot and left virtual machine instances running.
terraform destroy -auto-approve
tl;dr
In this guide, we went from zero to a fully automated N8N instance by:
Generating a DigitalOcean API token for Terraform to provision infrastructure
Writing a Terraform configuration to spin up a Droplet and SSH access
Using Terraform to run initialization commands and our Ansible playbook
Creating an Ansible playbook to install dependencies, Docker, Caddy proxy, and the N8N application
Printing the Droplet IP address from Terraform to configure DNS records
Pointing our domain to the new N8N server IP
Accessing the automated N8N instance through our configured subdomain
Tearing down the entire infrastructure with one line command
We implemented infrastructure-as-code best practices by defining all our infrastructure and configurations as reusable code. Now we can tear down and reliably recreate consistent N8N test and production environments on demand.
Overall this guide took us from a manual setup prone to errors and cruft to a fully automated N8N deployment following DevOps principles.
If you encounter any challenges, have suggestions for improvements, or simply want to share your success stories, I would love to hear from you. Your insights may not only help you but also fellow readers who are on a similar journey.
References
Digital Ocean | n8n Docs. (n.d.). Retrieved December 15, 2023, from https://docs.n8n.io/hosting/installation/server-setups/digital-ocean/
Digitalocean_droplet | Resources | digitalocean/digitalocean | Terraform | Terraform Registry. (n.d.). Retrieved December 15, 2023, from https://registry.terraform.io/providers/digitalocean/digitalocean/latest/docs/resources/droplet#attributes-reference
Ellingwood, J. (n.d.). Initial Server Setup with Ubuntu 14.04 | DigitalOcean. Retrieved December 15, 2023, from https://www.digitalocean.com/community/tutorials/initial-server-setup-with-ubuntu-14-04
How to Run Sudo Command Without Password. (2019, June 28). https://linuxize.com/post/how-to-run-sudo-command-without-password/
How To Use Ansible with Terraform for Configuration Management | DigitalOcean. (n.d.). Retrieved December 15, 2023, from https://www.digitalocean.com/community/tutorials/how-to-use-ansible-with-terraform-for-configuration-management
Using Variables—Ansible Documentation. (n.d.). Retrieved December 15, 2023, from https://docs.ansible.com/ansible/latest/playbook_guide/playbooks_variables.html
In this step-by-step guide, we'll build a practical DevOps project, covering everything from creating a local Kind Kubernetes cluster to deploying a Node.js application, all while harnessing the power of Terraform and Helm. We will also implement monitoring for the local infrastructure and app with Prometheus and Grafana.
To follow along, please note
Linux Environment: You need a Linux/Unix environment to run the commands mentioned in this guide. You can use WSL or a virtual machine if you're on Windows.
Docker: Make sure Docker is installed on your machine, as it is required to run Kubernetes in Docker (kind).
kubectl: Install
kubectl, the Kubernetes command-line tool, to interact with your Kubernetes cluster. See the Docs for the installation guide.Terraform: Install Terraform for infrastructure provisioning. I use tfenv to install and manage Terraform versions.
Node.js: Install Node.js if you haven't already. See the Docs for the installation guide.
DockerHub Account: Create a DockerHub account if you don't have one to push your Docker images.
Step 1: Setup a Kubernetes Cluster using kind
Install
kind# Install kind (Kubernetes in Docker) [ $(uname -m) = x86_64 ] && curl -Lo ./kind https://kind.sigs.k8s.io/dl/v0.20.0/kind-linux-amd64 chmod +x ./kind sudo mv ./kind /usr/local/bin/kind
Step 2: Write a Bash Script for Cluster Deployment
First, we will create the Kind cluster with a configuration file that will specify appropriate DNS configurations that allow the pulling of images. Create a file called
cluster_config.yamland insert the following code:--- kind: Cluster apiVersion: kind.x-k8s.io/v1alpha4 nodes: - role: control-plane extraPortMappings: - containerPort: 53 hostPort: 53 protocol: UDP - containerPort: 53 hostPort: 53 protocol: TCPCreate a Bash script to automate the cluster deployment process. The script will also download the kubeconfig for the cluster for use later. Let's call it
ignite_cluster.sh:#!/bin/bash # Create a Kubernetes cluster with kind kind create cluster --config ./cluster_config.yaml --name ignite-cluster # Download kubeconfig mkdir -p ~/.kube kind get kubeconfig --name ignite-cluster > ~/.kube/configMake the script executable:
chmod +x ignite_cluster.shRun the script:
./ignite_cluster.sh
Step 3: Dockerize a Simple Express App and Push to DockerHub
Create a simple
Hello WordNode.js/Express app with the following stepsCreate a directory named
ignappandcdinto itRun
npm initInstall
expressby runningnpm install expressCreate a file named
ignapp.jsand insert the following code:
      const express = require('express')
      const app = express()
      const port = 3210

      app.get('/', (req, res) => {
      res.send('Hello World!')
      })

      app.listen(port, () => {
      console.log(`Example app listening on port ${port}`)
      })
- Run
node ignapp.jsand use Postman to send a GET request tolocalhost:3210to getHello Worldas a response.
Now, Dockerize it! Create a
Dockerfilein theignappdirectory and insert the following code:# Use an official Node.js runtime as the base image FROM node:20-alpine # Set the working directory in the container WORKDIR /app # Copy package.json and package-lock.json to the working directory COPY package*.json ./ # Install app dependencies RUN npm install # Copy the rest of the application code to the working directory COPY . . # Expose port 3210 EXPOSE 3210 # Define the command to run the application CMD ["node", "ignapp.js"]Build and push the Docker image:
  docker build -t <your-dockerhub-username>/ignapp:1.0 .
  docker push <your-dockerhub-username>/ignapp:1.0
Step 4: Create a Kubernetes Deployment Manifest
Create a directory called
ign_deploymentto hold our deployment code.Within the
ign_deployment, create a Kubernetes deployment manifest file calledign_k8s_deployment.yamlfor our app. Insert the following code which will pull our image from DockerHub and deploy it into the cluster:--- apiVersion: apps/v1 kind: Deployment metadata: name: ignapp spec: replicas: 3 selector: matchLabels: app: ignapp template: metadata: labels: app: ignapp spec: containers: - name: ignapp image: dankuta/ignapp:1.0 ports: - containerPort: 3210 --- apiVersion: v1 kind: Service metadata: name: ignapp-service spec: selector: app: ignapp ports: - protocol: TCP port: 3210 targetPort: 3210
Step 5: Deploy the Node.js App to the Kubernetes Cluster using the Deployment Manifest and Terraform
Create a Terraform configuration to deploy the Kubernetes manifest created above using the
kubectlTerraform provider. Add the following to yourmain.tf. Your Terraform configuration can be structured thus within theign_deploymentdirectory:ign_deployment/ ├── ign_k8s_deployment.yaml ├── main.tf ├── myvars.auto.tfvars ├── providers.tf └── variables.tfRemember to add the variable for the Kubernetes config path. This is how Terraform would know what cluster to deploy into.
  terraform {
  required_version = ">= 0.13"

  required_providers {
      kubectl = {
      source  = "gavinbunney/kubectl"
      version = ">= 1.7.0"
      }
  }
  }

  provider "kubectl" {
  load_config_file = true
  config_path      = var.kube_config_path
  }

  resource "kubectl_manifest" "ignapp" {
  yaml_body = file("${path.module}/ign_k8s_deployment.yaml")
  }
Run
terraform init,terraform plan, andterraform applyto deploy the app intoignite_cluster
Step 6: Using Helm and Terraform, Install Kube-Prometheus Stack in the Cluster for Monitoring and Observability
First, ensure
Helmis installed. See the Docs to use the installation guide.We will use kube-prometheus-stack which will install all the necessary tools we need right now such as
Prometheus,Grafana,AlertManager, andPrometheus Node Exporter.To install this using Terraform and Helm, we will add the helm terraform provider to our Terraform configuration:
  provider "helm" {
      kubernetes {
          config_path = var.kube_config_path
      }
  }
Add a new
helm_releaseresource block tomain.tf:resource "helm_release" "kube_prom" { name = "kube-prometheus-stack" chart = "prometheus-community/kube-prometheus-stack" }Before running
terraform init, ensure you have added thekube-prometheus-stackrepository:helm repo add prometheus-community https://prometheus-community.github.io/helm-charts helm repo updateRun
terraform init,terraform plan, andterraform applyto deploykube-prometheus-stackintoignite_cluster
Step 7: Setup Monitoring and Observability of the Cluster with Prometheus and Grafana
After the Terraform deployment is successful, you should have kube-prometheus up and running in your Kubernetes cluster.
To access the monitoring stack, you can use port forwarding to access the Grafana dashboard, Prometheus, and other components. Run each of these commands in a new terminal tab:
  kubectl port-forward deployment/kube-prometheus-stack-grafana 3220:3000
  kubectl port-forward deployment/kube-prometheus-stack-prometheus 9090:9090
Access Grafana in your web browser at http://localhost:3220. The default username is
adminand the default password isprom-operator.
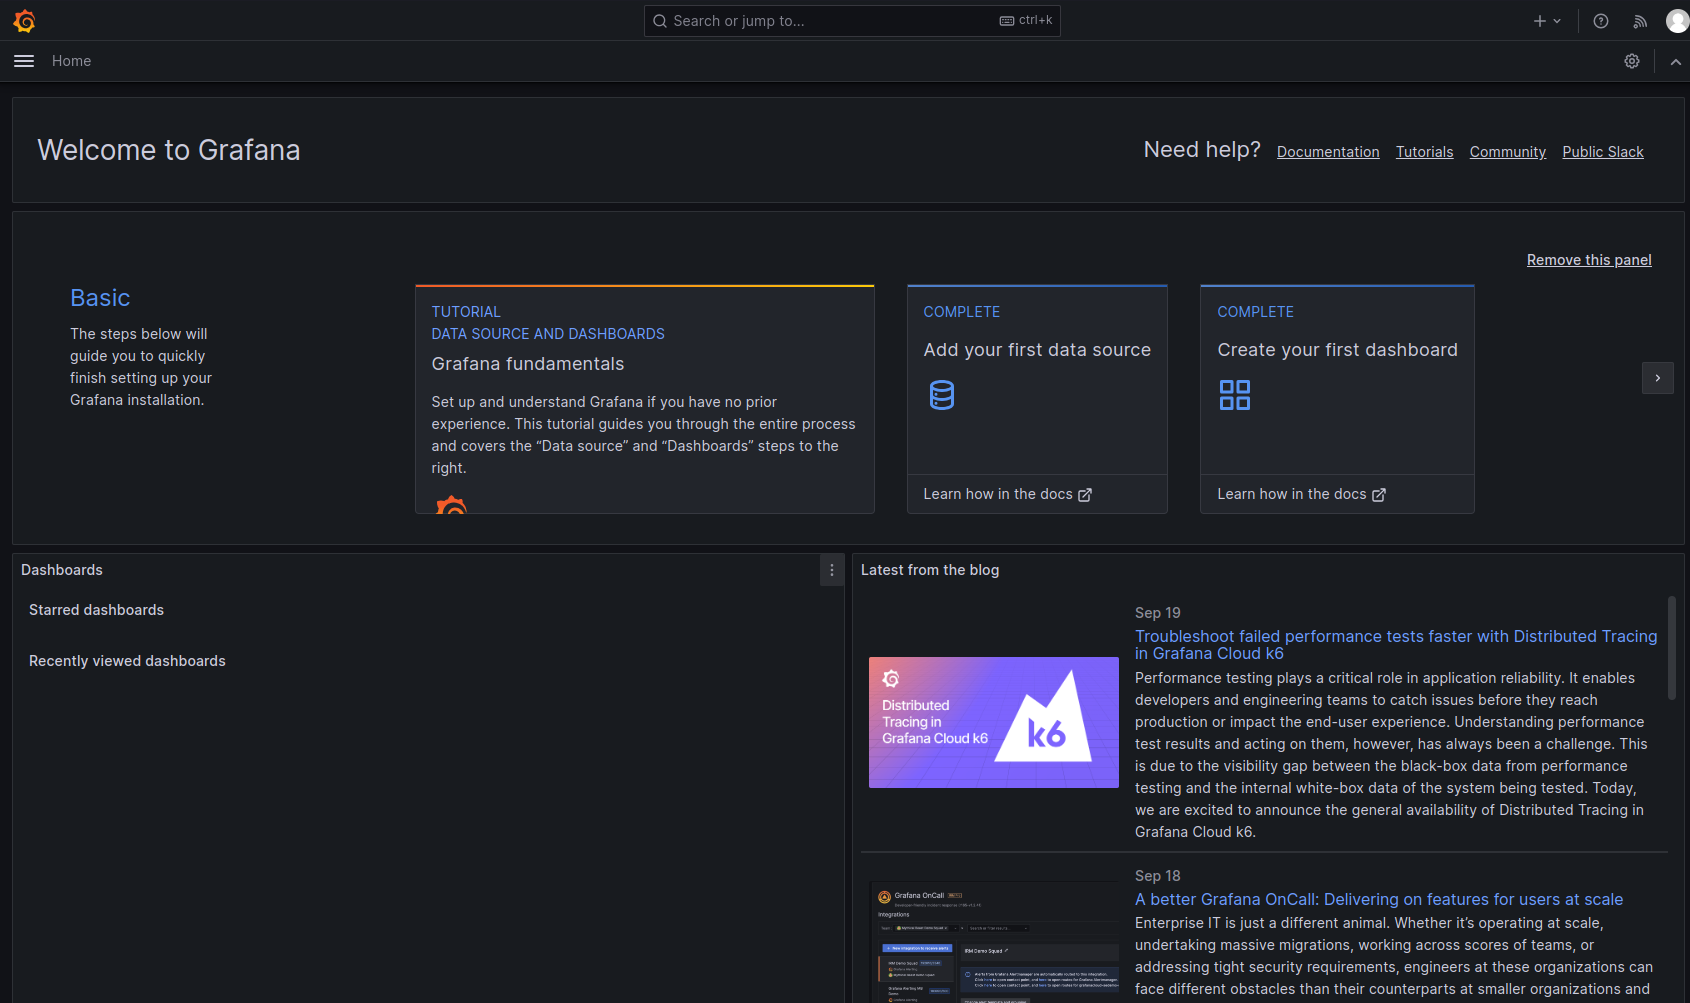
Access Prometheus in your web browser at http://localhost:9090.
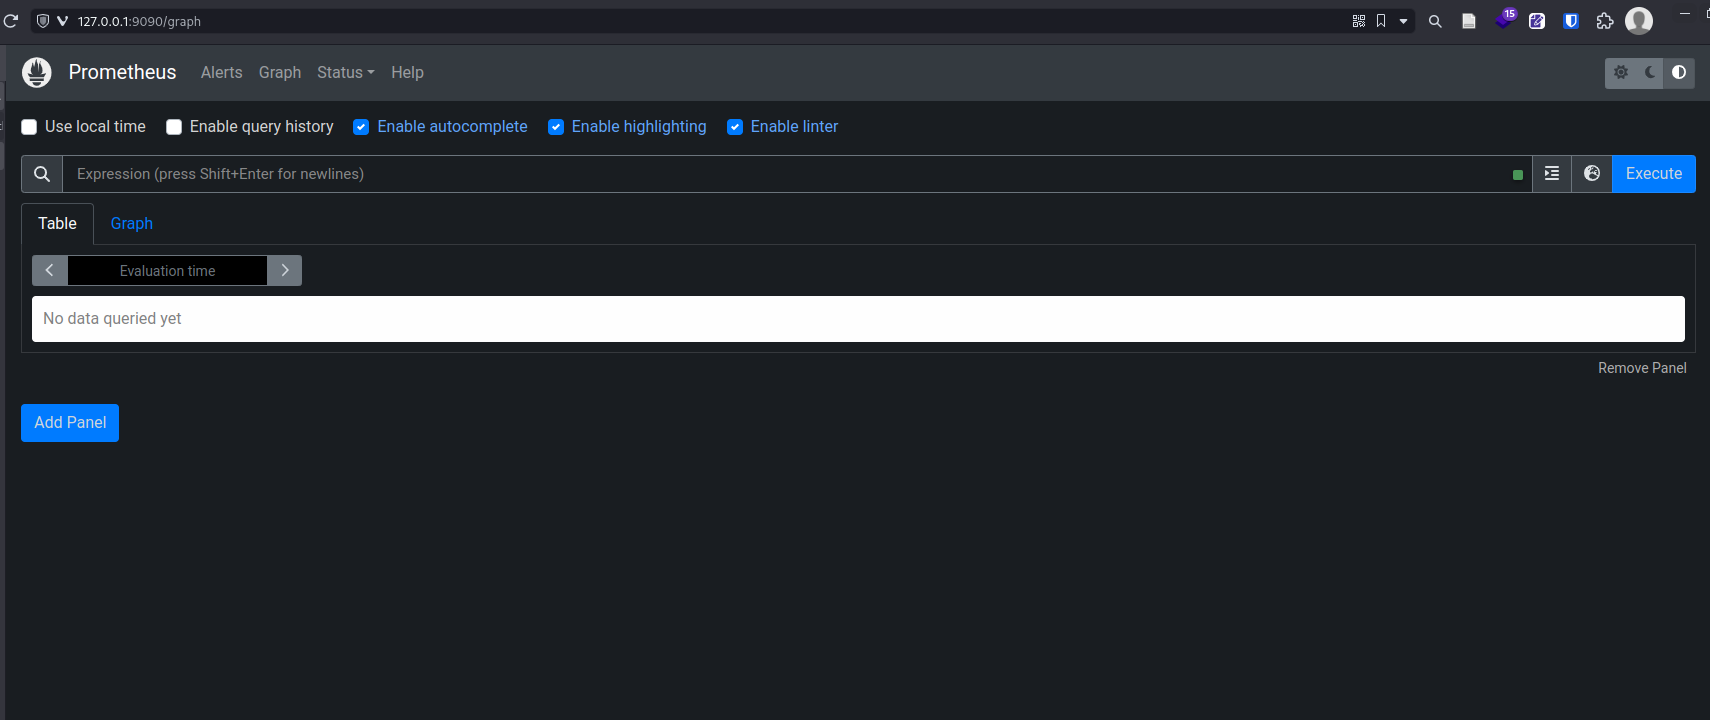
By default, using this deployment, Prometheus scrapes data from the cluster using ServiceMonitor and also by default Grafana is connected to and draws on Prometheus as a data source.
Step 8: Configure Monitoring and Observability of the IgnApp
- Using Helm, we will install
Prometheus BlackBox Exporterto fetch data from theignappendpoint, translate the data to Prometheus Metrics and expose the/metricsendpoint. The Helm chart will also Create a service for connecting to the exporter, and Configure ServiceMonitor with thevalueswe pass to it so Prometheus can discover the exporter.
Congratulations on completing this comprehensive guide to setting up a local Kind Kubernetes cluster, harnessing Terraform, Helm, and implementing robust monitoring with Prometheus and Grafana. You've taken significant steps toward mastering the DevOps landscape, and you now have a solid foundation for deploying and monitoring applications in Kubernetes environments.
Remember that DevOps is not just a skill; it's a mindset. With these newfound skills, you're well-equipped to tackle real-world challenges, automate workflows, ensure application reliability, and drive continuous improvement.
As you continue your DevOps journey, stay curious, explore new technologies, and embrace best practices. Keep sharing your knowledge with the community, and never stop learning.
]]>Now, we will turn our focus to writing Terraform code that defines multiple resources for creating subnets in different layers within an AWS VPC. First a glance at the full picture of what we are building.
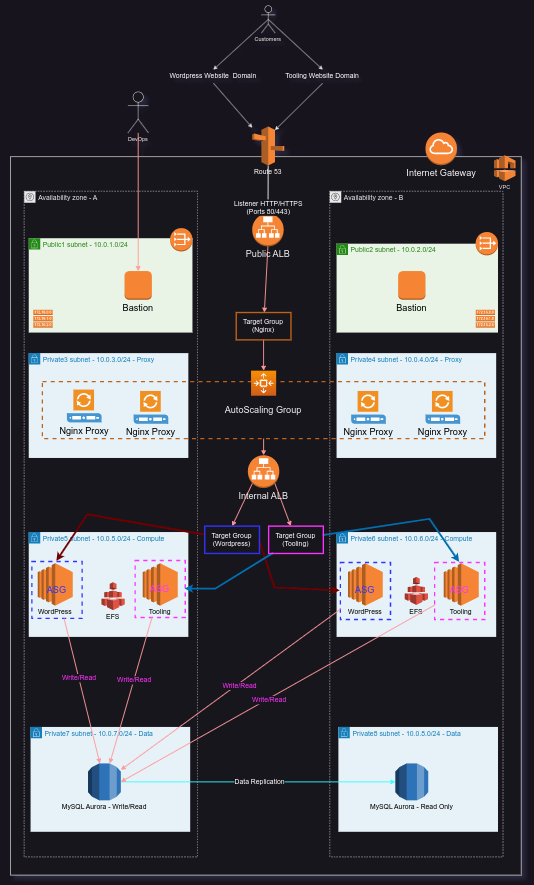
Create the subnets in their respective layers
Let's write code blocks to enable the creation of subnets in different layers of an AWS VPC, allowing us to organize resources within the VPC based on their intended use or function.
# Create public layer subnets
resource "aws_subnet" "public-subnet-punltd" {
  vpc_id                  = aws_vpc.part-unltd-vpc.id
  cidr_block              = cidrsubnet(var.vpc_cidr, 8 , count.index + (var.layer-subnets-num*1))
  map_public_ip_on_launch = true
  count                   = var.layer-subnets-num == null || var.layer-subnets-num <= 0 || var.layer-subnets-num > length(data.aws_availability_zones.az-list.names) - 1 ? length(data.aws_availability_zones.az-list.names) : var.layer-subnets-num
  availability_zone       = data.aws_availability_zones.az-list.names[count.index]
  tags = merge(
    var.tags, {
      Name = "public-subnet-${var.org_code}-${data.aws_availability_zones.az-list.names[count.index]}"
    }
  )
}


# Create proxy layer subnets
resource "aws_subnet" "prv-proxy-subnet-punltd" {
  vpc_id                  = aws_vpc.part-unltd-vpc.id
  cidr_block              = cidrsubnet(var.vpc_cidr, 8 , count.index + (var.layer-subnets-num*2))
  map_public_ip_on_launch = true
  count                   = var.layer-subnets-num == null || var.layer-subnets-num <= 0 || var.layer-subnets-num > length(data.aws_availability_zones.az-list.names) - 1 ? length(data.aws_availability_zones.az-list.names) : var.layer-subnets-num
  availability_zone       = data.aws_availability_zones.az-list.names[count.index]
  tags = merge(
    var.tags, {
      Name = "proxy-subnet-${var.org_code}-${data.aws_availability_zones.az-list.names[count.index]}"
    }
  )
}


# Create compute layer subnets
resource "aws_subnet" "prv-compute-subnet-punltd" {
  vpc_id                  = aws_vpc.part-unltd-vpc.id
  cidr_block              = cidrsubnet(var.vpc_cidr, 8 , count.index + (var.layer-subnets-num*3))
  map_public_ip_on_launch = true
  count                   = var.layer-subnets-num == null || var.layer-subnets-num <= 0 || var.layer-subnets-num > length(data.aws_availability_zones.az-list.names) - 1 ? length(data.aws_availability_zones.az-list.names) : var.layer-subnets-num
  availability_zone       = data.aws_availability_zones.az-list.names[count.index]
  tags = merge(
    var.tags, {
      Name = "compute-subnet-${var.org_code}-${data.aws_availability_zones.az-list.names[count.index]}"
    }
  )
}


# Create data layer subnets
resource "aws_subnet" "prv-data-subnet-punltd" {
  vpc_id                  = aws_vpc.part-unltd-vpc.id
  cidr_block              = cidrsubnet(var.vpc_cidr, 8 , count.index + (var.layer-subnets-num*4))
  map_public_ip_on_launch = true
  count                   = var.layer-subnets-num == null || var.layer-subnets-num <= 0 || var.layer-subnets-num > length(data.aws_availability_zones.az-list.names) - 1 ? length(data.aws_availability_zones.az-list.names) : var.layer-subnets-num
  availability_zone       = data.aws_availability_zones.az-list.names[count.index]
  tags = merge(
    var.tags, {
      Name = "data-subnet-${var.org_code}-${data.aws_availability_zones.az-list.names[count.index]}"
    }
  )
}
Here's a brief explanation of each block:
Create public layer subnets:
This block defines the creation of public layer subnets with the
aws_subnetresource type.The
cidr_blockspecifies the IP range for the subnet usingcidrsubnetfunction, wherevar.vpc_cidris the base CIDR block of the VPC.map_public_ip_on_launchis set totrue, enabling instances in the subnet to automatically receive a public IP address.The
countparameter controls the number of subnets created based on the value ofvar.layer-subnets-num.availability_zonedetermines the availability zone for each subnet based on the list of availability zones obtained fromdata.aws_availability_zones.Tags are assigned to each subnet for identification purposes.
Create proxy layer subnets:
This block defines the creation of proxy layer subnets.
It follows a similar structure as the public layer subnets block, but the
cidr_blockcalculation includesvar.layer-subnets-num*2.The subnet names are prefixed with "proxy-subnet".
Create compute layer subnets:
This block defines the creation of compute layer subnets.
It follows a similar structure as the previous blocks, but the
cidr_blockcalculation includesvar.layer-subnets-num*3.The subnet names are prefixed with "compute-subnet".
Create data layer subnets:
This block defines the creation of data layer subnets.
It follows a similar structure as the previous blocks, but the
cidr_blockcalculation includesvar.layer-subnets-num*4.The subnet names are prefixed with "data-subnet".
Next we will create the necessary infrastructure components for enabling outbound internet access from private subnets in the VPC using NAT Gateway. We will also create an internet gateway that provides connectivity to the internet, an Elastic IP that will provide a static public IP address for the NAT Gateway which will facilitate secure outbound traffic from the private subnets.
Creating the Route Tables & Routes
We will now define public and private route tables, associate them with the respective subnets, and establish connectivity between different layers of our infrastructure.
# Create Public Route Table
resource "aws_route_table" "public_rtb" {
  vpc_id = aws_vpc.part-unltd-vpc.id


  route {
    cidr_block = "0.0.0.0/0"
    gateway_id = aws_internet_gateway.ig-punltd.id
  }

  tags = merge(
    var.tags, {
        Name = "${var.org_code}-public-rtb"
    }
  )
}

# Associate Public Route Table with Public layer Subnets
resource "aws_route_table_association" "public_subnets_rtb_assoc" {
    count          = var.layer-subnets-num == null || var.layer-subnets-num <= 0 || var.layer-subnets-num > length(data.aws_availability_zones.az-list.names) - 1 ? length(data.aws_availability_zones.az-list.names) : var.layer-subnets-num
    subnet_id      = aws_subnet.public-subnet-punltd[count.index].id
    route_table_id = aws_route_table.public_rtb.id
}

# Create Private Route Table
resource "aws_route_table" "private_rtb" {
  vpc_id = aws_vpc.part-unltd-vpc.id

  tags = merge(
    var.tags, {
        Name = "${var.org_code}-private-rtb"
    }
  )
}

# Associate subnets with the private route table
resource "aws_route_table_association" "private_subnet_association" {
  count             = var.layer-subnets-num == null || var.layer-subnets-num <= 0 || var.layer-subnets-num > length(data.aws_availability_zones.az-list.names) - 1 ? length(data.aws_availability_zones.az-list.names) : var.layer-subnets-num
  subnet_id         = aws_subnet.prv-proxy-subnet-punltd[count.index].id
  route_table_id    = aws_route_table.private_rtb.id
}

resource "aws_route_table_association" "private_subnet_association_compute" {
  count             = var.layer-subnets-num == null || var.layer-subnets-num <= 0 || var.layer-subnets-num > length(data.aws_availability_zones.az-list.names) - 1 ? length(data.aws_availability_zones.az-list.names) : var.layer-subnets-num
  subnet_id         = aws_subnet.prv-compute-subnet-punltd[count.index].id
  route_table_id    = aws_route_table.private_rtb.id
}

resource "aws_route_table_association" "private_subnet_association_data" {
  count             = var.layer-subnets-num == null || var.layer-subnets-num <= 0 || var.layer-subnets-num > length(data.aws_availability_zones.az-list.names) - 1 ? length(data.aws_availability_zones.az-list.names) : var.layer-subnets-num
  subnet_id         = aws_subnet.prv-data-subnet-punltd[count.index].id
  route_table_id    = aws_route_table.private_rtb.id
}
Here's a brief explanation of each block:
Create Public Route Table:
The
aws_route_tableresource is used to create a public route table.The
vpc_idis set to the ID of the VPCpart-unltd-vpccreated earlier.The
routeblock specifies a default route (0.0.0.0/0) that directs traffic to the internet gateway (aws_internet_gateway.ig-punltd.id).Tags are assigned to the public route table for identification purposes.
Associate Public Route Table with Public Layer Subnets:
The
aws_route_table_associationresource is used to associate the public route table with the public layer subnets.The
countparameter determines the number of associations based on the value ofvar.layer-subnets-num.The
subnet_idis set to the ID of each public subnetpublic-subnet-punltd[count.index]created earlier.The
route_table_idis set to the ID of the public route tableaws_route_table.public_rtb.id.
Create Private Route Table:
The
aws_route_tableresource is used to create a private route table.The
vpc_idis set to the ID of the VPCpart-unltd-vpccreated earlier.Tags are assigned to the private route table for identification purposes.
Associate Subnets with the Private Route Table:
Multiple
aws_route_table_associationresources are used to associate the private route table with different subnets.Similar to the previous associations, the
countparameter determines the number of associations based on the value ofvar.layer-subnets-num.The
subnet_idis set to the ID of each corresponding subnet, such asprv-proxy-subnet-punltd,prv-compute-subnet-punltd, andprv-data-subnet-punltd.The
route_table_idis set to the ID of the private route tableaws_route_table.private_rtb.id.
These code blocks establish the routing infrastructure by creating public and private route tables and associating them with the corresponding subnets. The public route table directs internet-bound traffic through the internet gateway, while the private route table is used for internal communication within the VPC. This setup helps achieve high availability and isolation in the cloud solution.
We have now successfully set up the networking infrastructure for our high-availability cloud solution on AWS using Terraform. The creation of public and private route tables, along with their associations to the subnets, enables secure communication and proper routing within the environment.
In the next sections, we will continue building upon this foundation by adding additional components to enhance the overall reliability, scalability, and security of our solution.
]]>This is the first iteration of this code, and values will be hard-coded at first. In subsequent iterations and refactoring, the project will be segmented into modules and variables will be used.
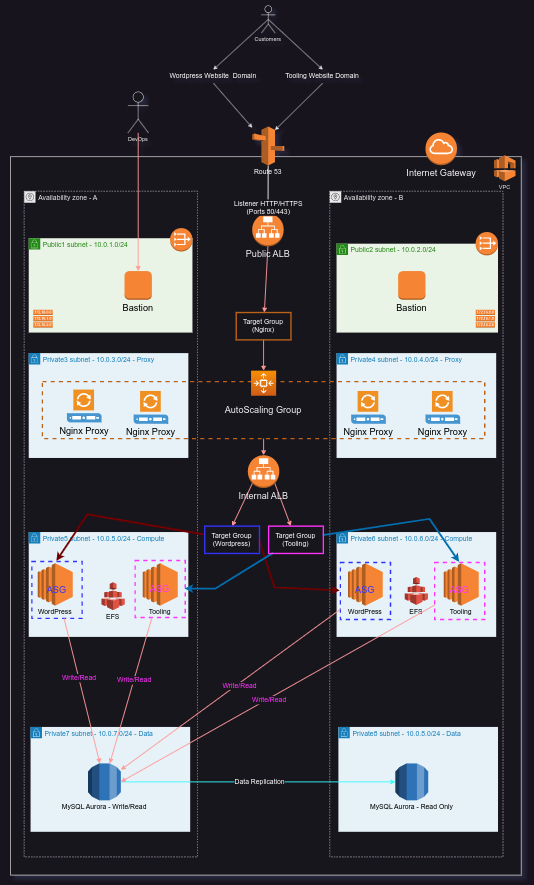
AWS Cloud Solution Architecture
Here is the architecture of the project we will build in this series. In part 1, we will focus on building out the networking infrastructure such as the VPC and Subnets.
Preparations
Create an
IAMuser account that has full administrator access and programmatic access. Best practice is to first create a user group with the necessary Permission Policies attached to the group, then add the user to the group.Create and save access keys for programmatic access via AWS CLI
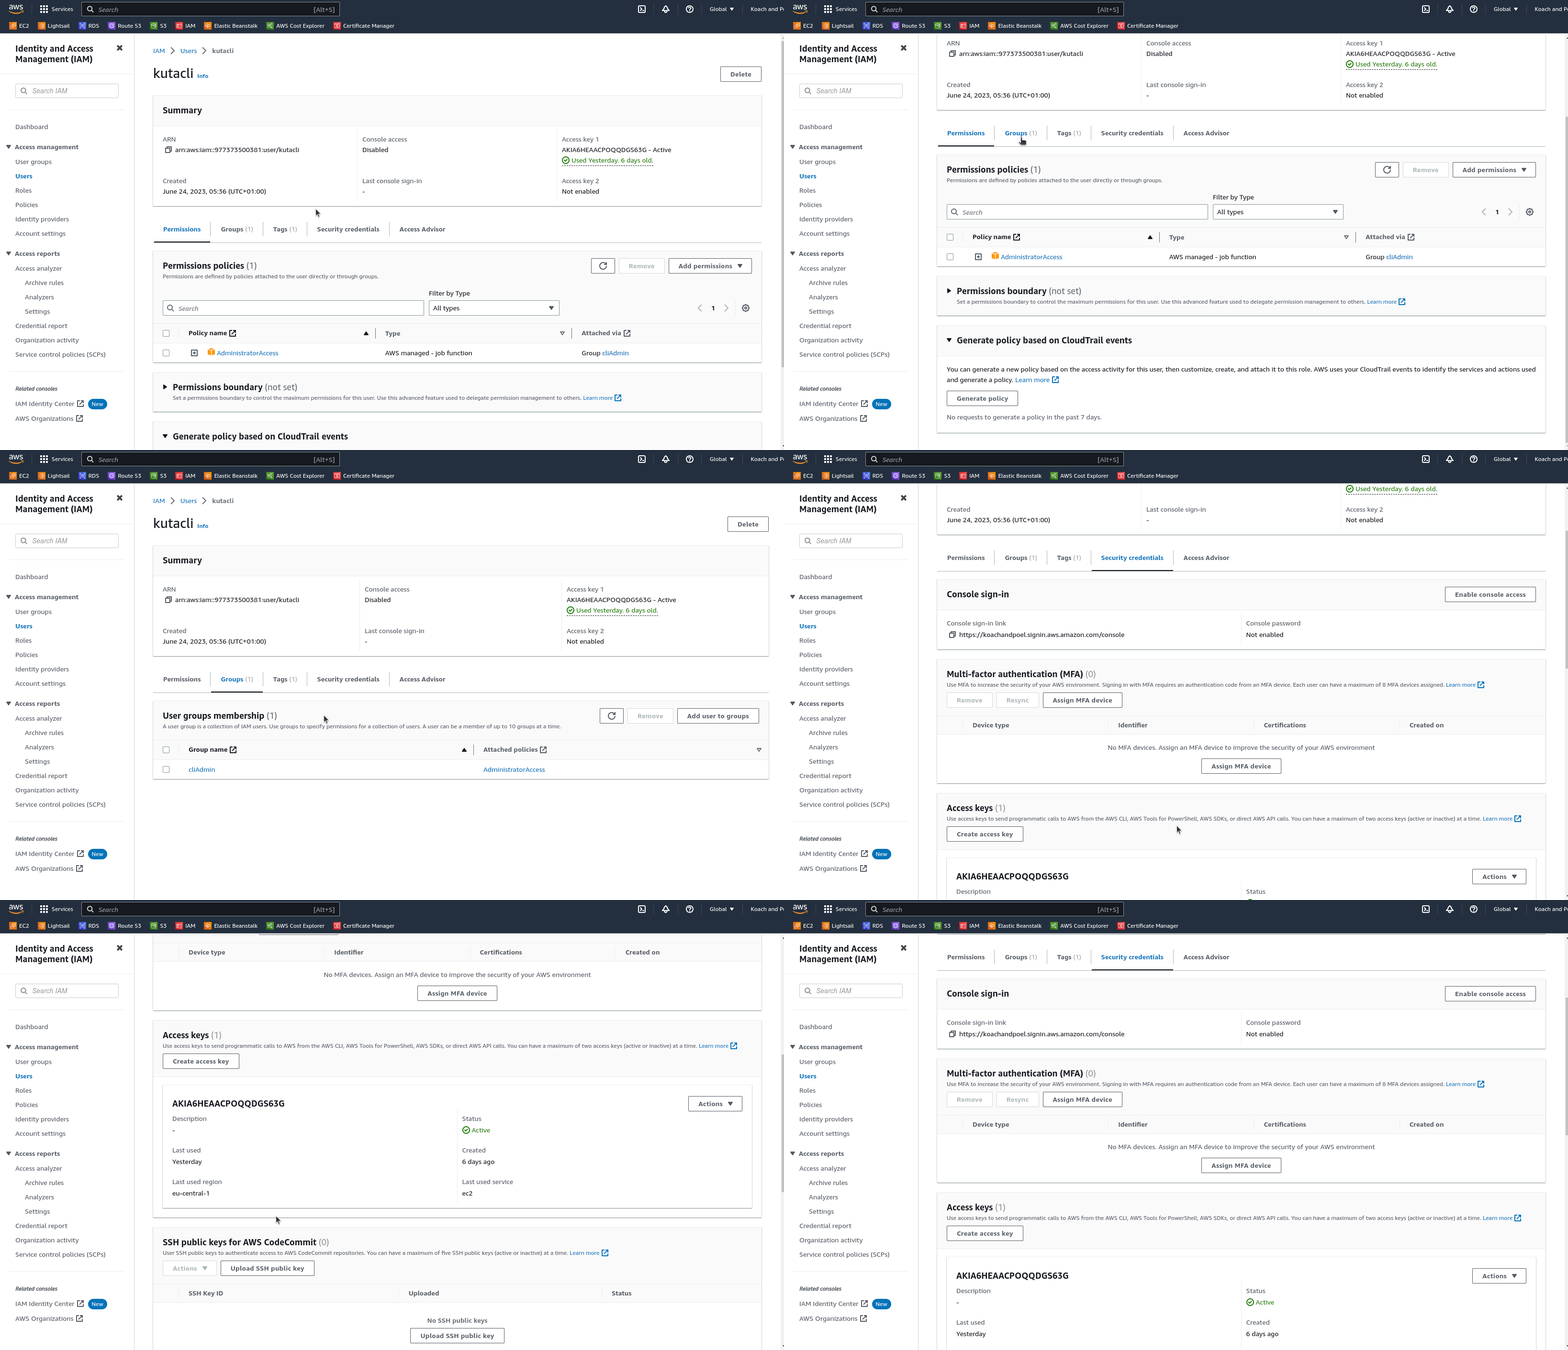
Install
Boto3and ensure Python is installed on the computerInstall and configure AWS CLI in terminal
Install Terraform with tfenv
  git clone --depth=1 https://github.com/tfutils/tfenv.git ~/.tfenv
  sudo ln -s ~/.tfenv/bin/* /usr/local/bin
  tfenv install
Begin Terraform Configuration
Create and navigate to a new directory for this Terraform project.
Create file
provider.tfto specify provider configurations. Insert the following:provider "aws" { region = "us-east-1" }
Setting up the VPC and Public Subnets
Create another file
main.tf. This will hold all configurations for now.Add the following block to create and manage the VPC resource:
  # Create VPS
  resource "aws_vpc" "part-unltd-vpc" {
    cidr_block                      = "10.0.0.0/16"
    enable_dns_support              = "true"
    enable_dns_hostnames            = "true"
    enable_classiclink              = "false"
    enable_classiclink_dns_support  = "false"
  }
Run
terraform initin the CLI to allow terraform to install the required plugins and connect to the AWS account.Create the VPC by running
terraform planthenterraform applyin CLI.
From here on out, execute terraform plan and terraform apply as often as the project is being built. This is to ensure that the infrastructure is being built properly. Due to Terraform's Idempotency feature, only changes will be applied. Also, with terraform destroy resources can be easily deprovisioned.
Create the 2 public subnets required by the architecture:
  # Create public subnet1
  resource "aws_subnet" "public-subnet1-punltd"{
    vpc_id                  = "aws_vpc.part-unltd-vpc.id"
    cidr_block              = "10.0.1.0/24"
    map_public_ip_on_launch = true
    availability_zone       = "us-east-1a"
  }

  # Create public subnet2
  resource "aws_subnet" "public-subnet2-punltd"{
    vpc_id                  = "aws_vpc.part-unltd-vpc.id"
    cidr_block              = "10.0.2.0/24"
    map_public_ip_on_launch = true
    availability_zone       = "us-east-1b"
  }
Refactoring the Code
Begin refactoring the code written so far by introducing variables. Create a file called
variables.tfto declare all the variables to be used for now. Insert the following:variable "region" { default = "us-east-1" } variable "vpc_cidr" { default = "10.0.0.0/16" } variable "enable_dns_support" { default = "true" } variable "enable_dns_hostnames" { default = "true" } variable "enable_classiclink" { default = "false" } variable "enable_classiclink_dns_support" { default = "false" }Return to
provider.tfand update the code to use the create variables:provider "aws" { region = var.region }Return to
main.tfand update the code to use the create variables:# Create VPS resource "aws_vpc" "part-unltd-vpc" { cidr_block = var.vpc_cidr enable_dns_support = var.enable_dns_support enable_dns_hostnames = var.enable_dns_hostnames enable_classiclink = var.enable_classiclink enable_classiclink_dns_support = var.enable_classiclink_dns_support }Use Terraform's Data Sources feature to fetch the list of available Availability Zones in the region configured. Add the following above the subnet blocks:
  # Fetch list of Availability Zones
  data "aws_availability_zones" "az-list" {
    state = "available"
  }
Use the data received to update the subnet blocks. Also use Terraform's
countfunction to create the 2 subnets by invoking a loop, instead of declaring two blocks like was done earlier. Hence, delete one of the public subnet blocks and update the remaining one:# Create public subnets resource "aws_subnet" "public-subnet-punltd" { vpc_id = "aws_vpc.part-unltd-vpc.id" cidr_block = "10.0.1.0/24" map_public_ip_on_launch = true count = 2 availability_zone = data.aws_availability_zones.az-list.names[count.index] }A
cidr_blockcannot be duplicated within a VPC. Hence the CIDR block in the subnets must be made dynamic for the configuration to work and be truly automated.- Use the
cidrsubnet()function.
- Use the
- Insert the VPC's CIDR range as the
prefix.
- Insert the VPC's CIDR range as the
- Number 8 as the
newbits.
- Number 8 as the
- Use
count.indexas the netnum.
- Use
- The paratmeters for the function are:
cidrsubnet(prefix, newbits, netnum)
- The paratmeters for the function are:
- The new entry will be thus:
cidr_block = cidrsubnet(var.vpc_cidr, 8 , count.index)
- The new entry will be thus:
With regions having varying amounts of Availability Zones, this infrastructure will need some logic to:
- Allow for the desired number of subnets to be specified.
- Use the number of the desired subnets if the number specified to create the subnets in the available AZs
- Where no desired number is specified, can use the default of 2 to create subnets in 2 AZs.
First, a variable will be declared for the desired number of subnets in the
variables.tffile:variable "public-subnets-num" { default = 2 }Return to the
main.tffile and update the public subnet block by replacing the count value with a conditional statement:resource "aws-subnet" "public-subnet-punltd" { vpc_id = "aws_vpc.part-unltd-vpc.id" cidr_block = cidrsubnet(var.vpc_cidr, 8 , count.index) map_public_ip_on_launch = true count = var.public-subnets-num == null || var.public-subnets-num <= 0 || var.public-subnets-num > length(data.aws_availability_zones.az-list.names) - 1 ? length(data.aws_availability_zones.az-list.names) : var.public-subnets-num availability_zone = data.aws_availability_zones.az-list.names[count.index] }The count statement checks to see if the
public-subnets-numvariable has been set tonullOR anumber equal to/less than 0OR anumber greater thanthe available AZs.If true, then the number of subnets to be created will be equal to the number of available AZs. Thus creating one subnet in all AZs.
If false, that is, a valid number that is within the number of available AZs, then the specified number of subnets will be created.
Now, create
terraform.tfvarsfile where all the values for the variables will be specified.region = "us-east-1" vpc_cidr = "10.0.0.0/16" enable_dns_support = "true" enable_dns_hostnames = "true" enable_classiclink = "false" enable_classiclink_dns_support = "false" preferred_number_of_public_subnets = 2
Run terraform plan and terraform apply to create the VPC and Subnets in AWS and to ensure there are no errors.